Reverse Engineering Dotnet Applications
Introduction
Why Reverse Engineering Dotnet Applications?
Reverse engineering dotnet applications can be useful to discover how the application works without access to the source code. Further, reverse engineering allows a developer to modify applications in their binary form, which again, can be done without source code. So for example, a developer looking to build a REST API on top of a third party vendor application that does not offer such functionality built-in, could use reverse-engineering to add additional functionality to the third party vendor app. In this case, that would be adding a REST API - or more likely, data output from the application to then be consumed by a REST API. In this blog post I will show you the basics of reverse engineering dotnet applications, including tooling and binary modification.
Test Application
We start off with a basic C# console application. The Program.cs file should look like this:
using System;
using System.Collections.Generic;
using System.Linq;
using System.Text;
using System.Threading.Tasks;

namespace ReverseEngineeringTestApp1
{
    internal class Program
    {
        static void Main(string[] args)
        {
            bool check = false;
            if (check)
            {
                System.Console.WriteLine("You Win!");
            }
            else
            {
                System.Console.WriteLine("You Lose!!");
            }
        }
    }
}
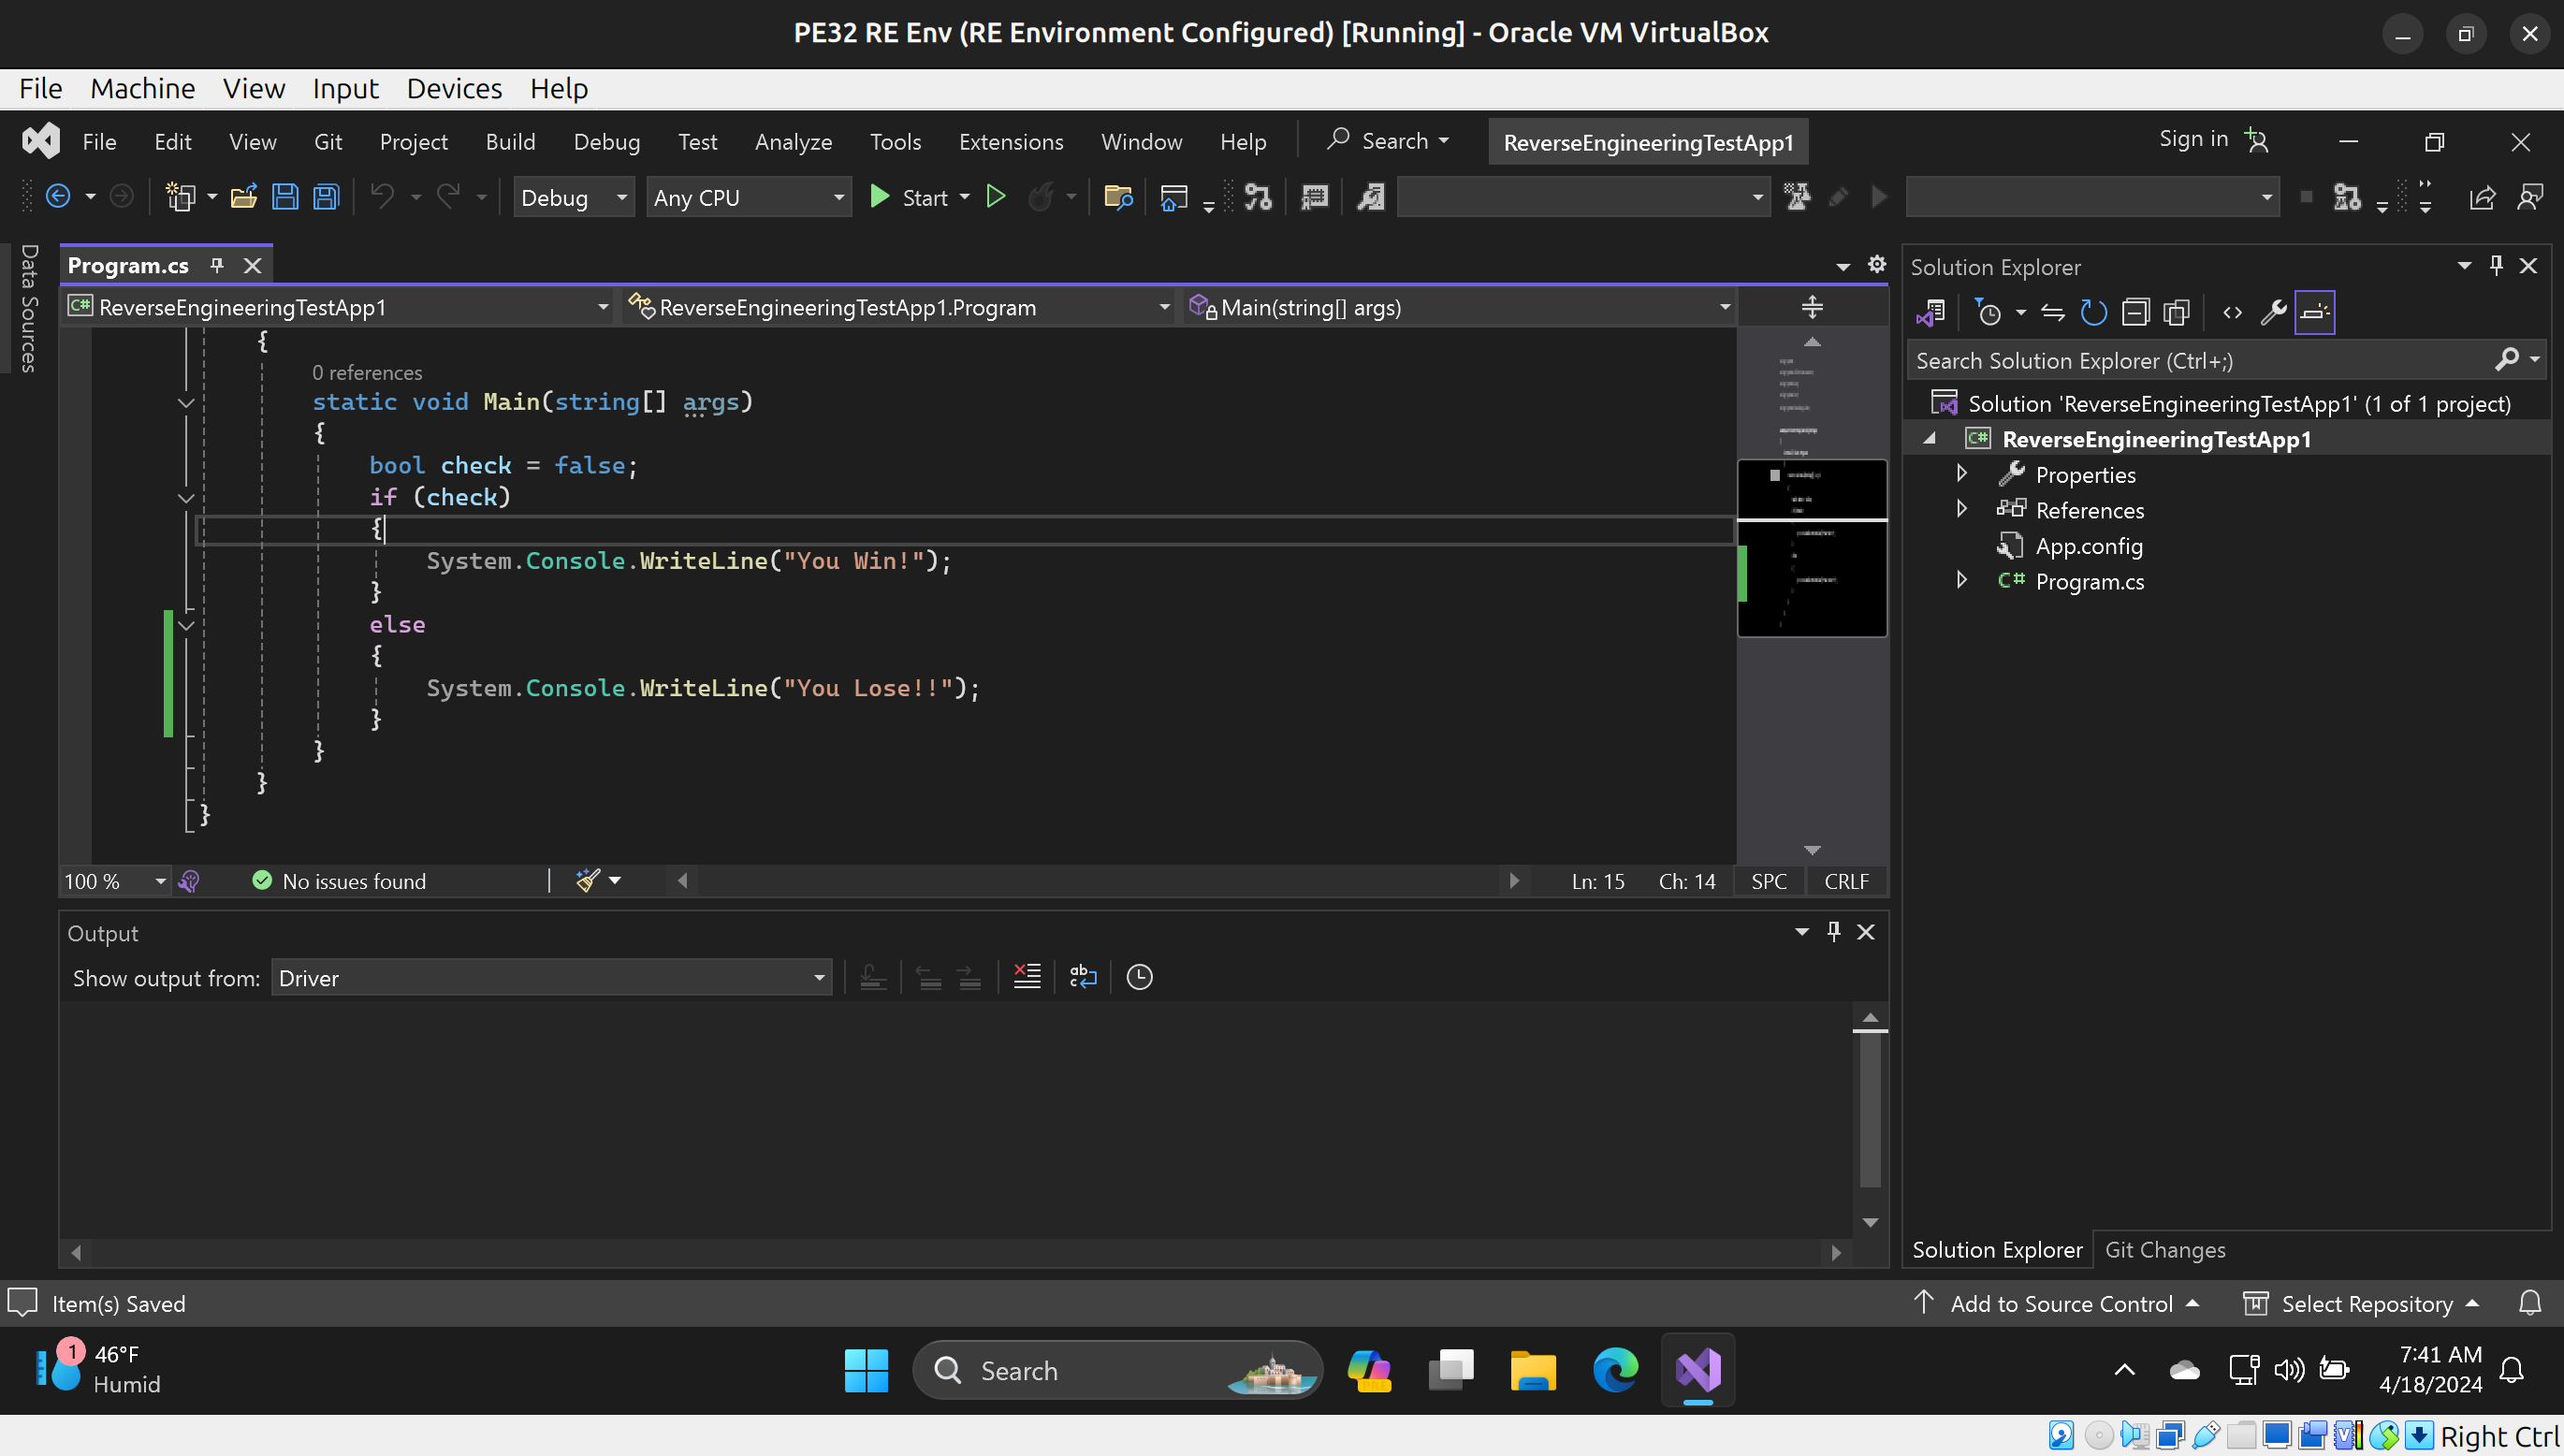
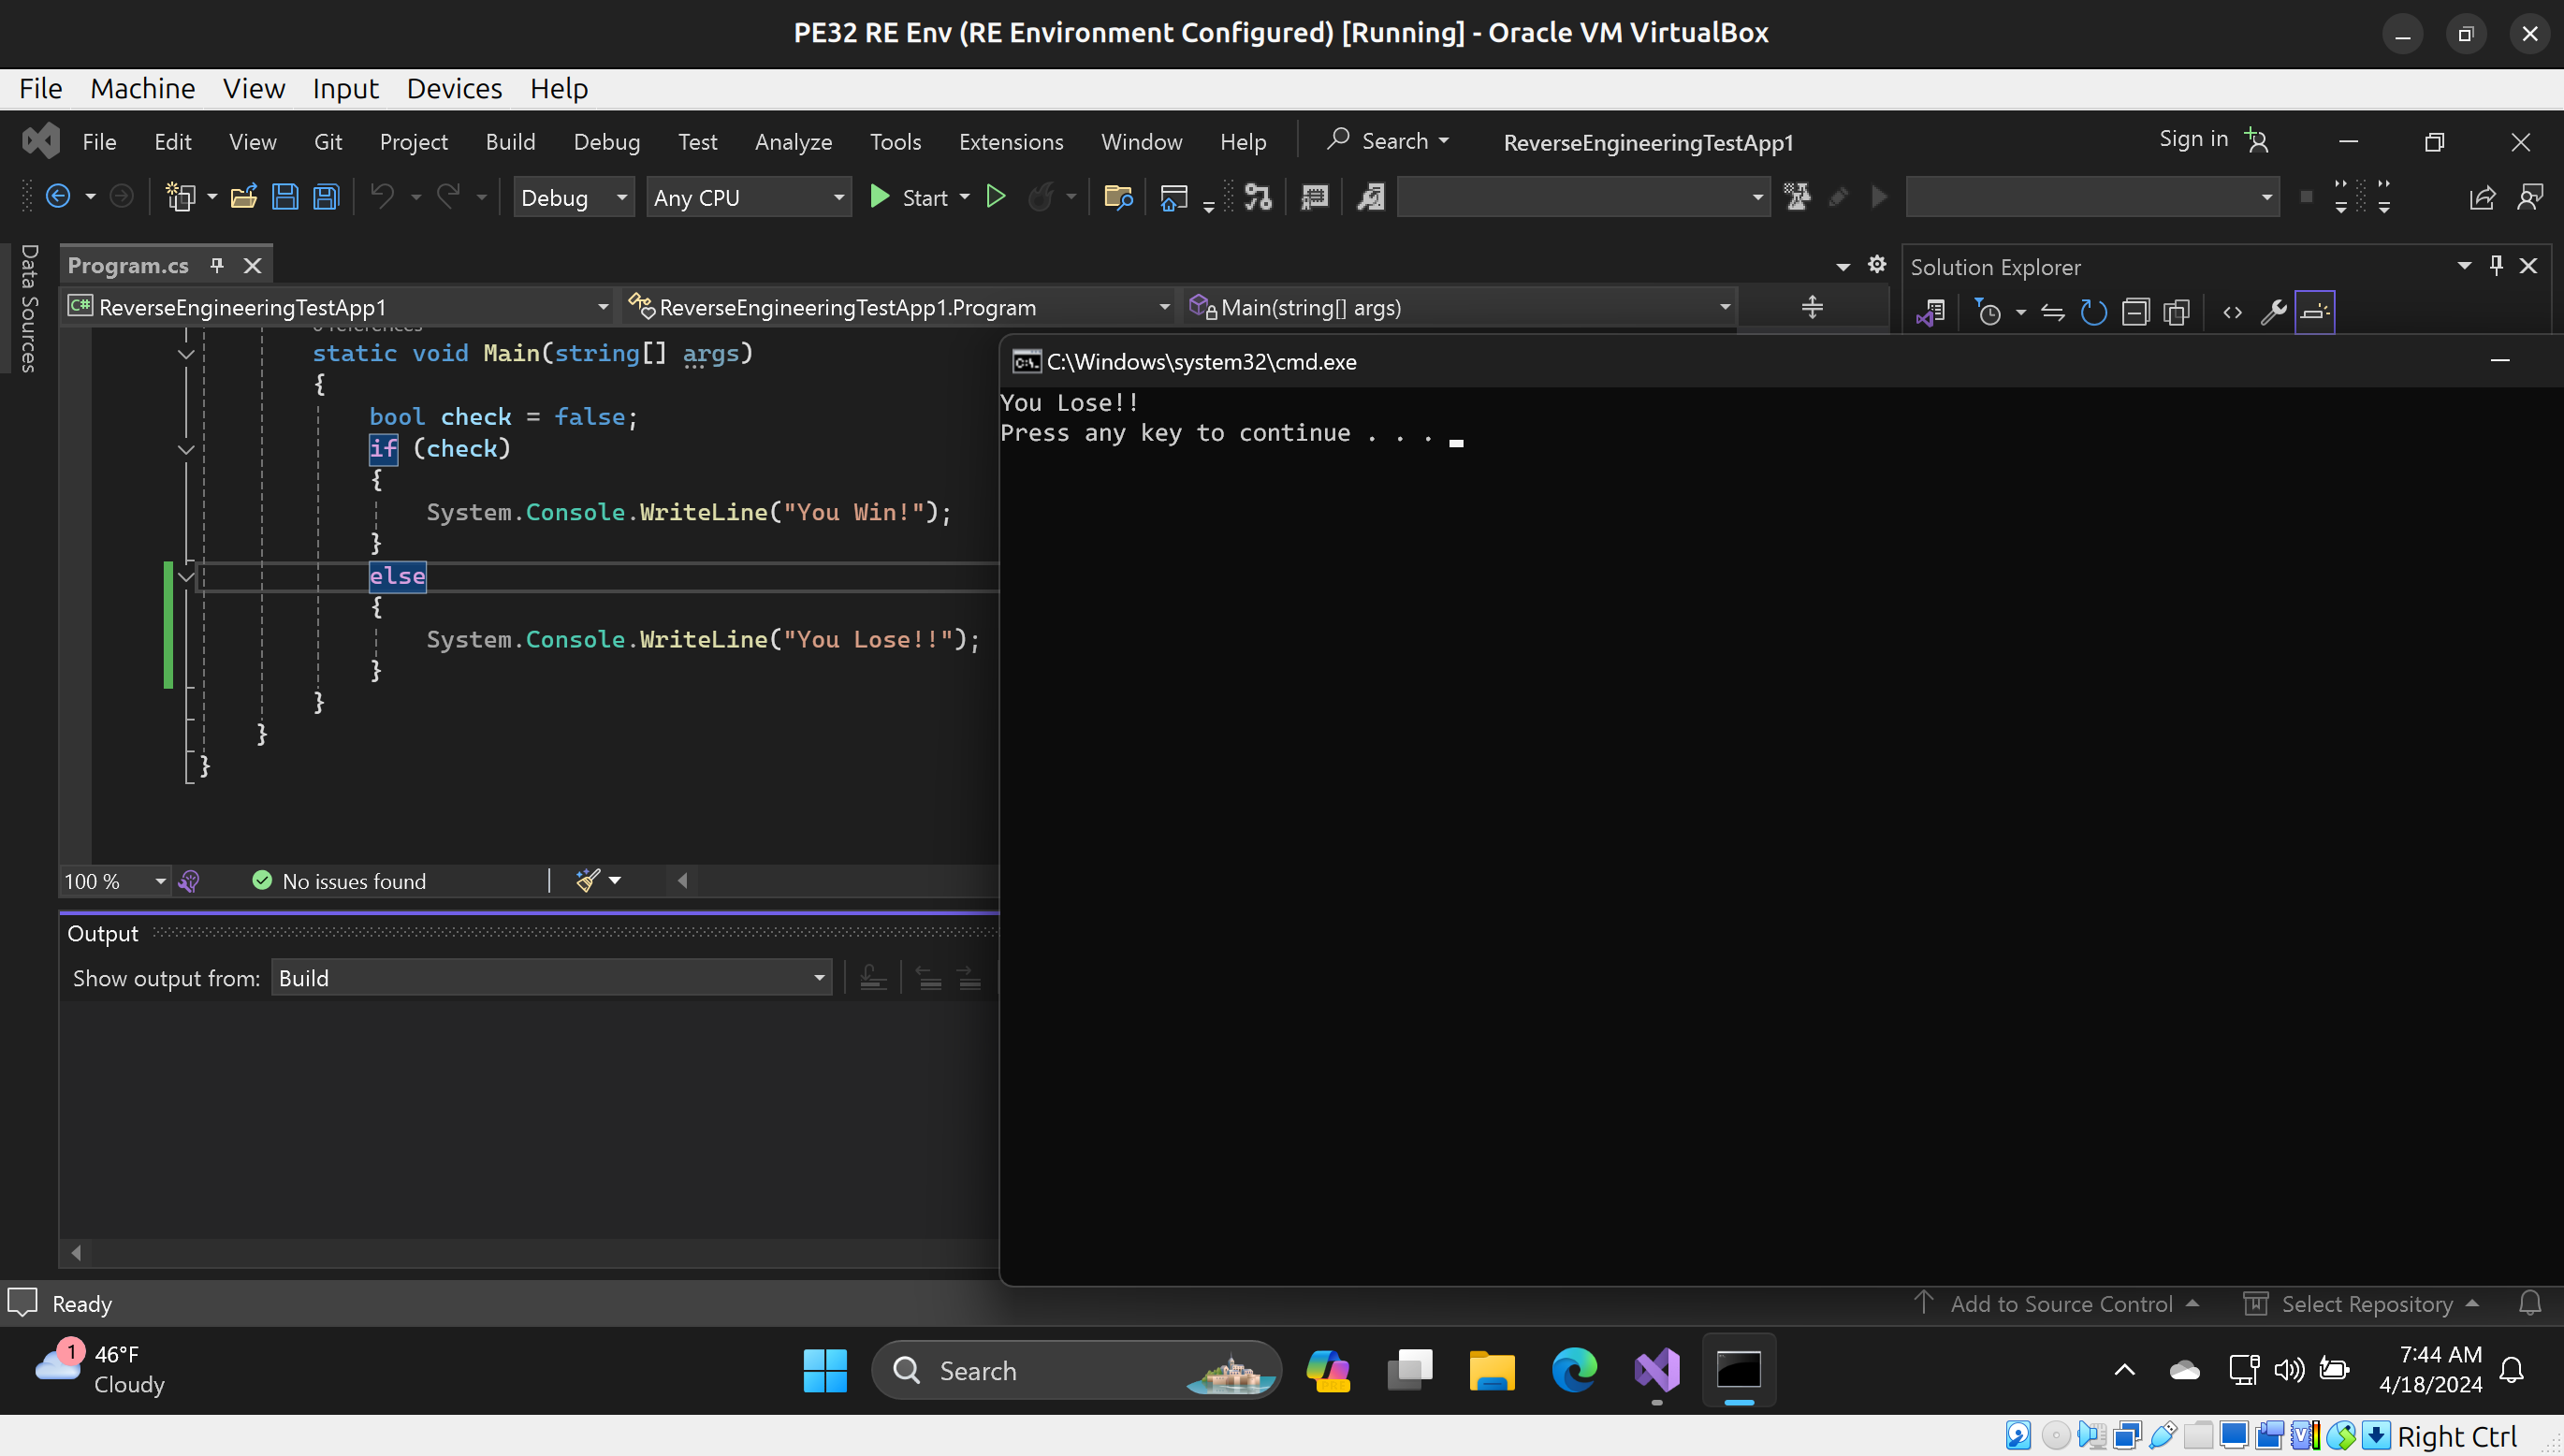
When we run the application by pressing CTRL+F5 (to avoid the console window closing immediately), we should be greeted with You Lose!!:
Now that we have compiled and run the application, we need to begin the reverse engineering process
Intermediary Language
The way the .NET CLR works is C# (or VB) applications are compiled down to MSIL (Microsoft Intermediary Langague), which is a binary file format. The binary application file is executed by the .NET CLR, which converts the binary application into native CPU instructions for execution by the CPU. We can interrupt this process by converting a binary application into MSIL, which is like x86/ARM assembly code but for .NET CLR. To do this we need to open up a Visual Studio Command Prompt. You will need Visual Studio Community (or higher) installed on your Windows host: https://visualstudio.microsoft.com/vs/community/.
So let’s do that! Open a Visual Studio Command Prompt by navigating in Visual Studio to Tools->Command Line->Developer Command Prompt
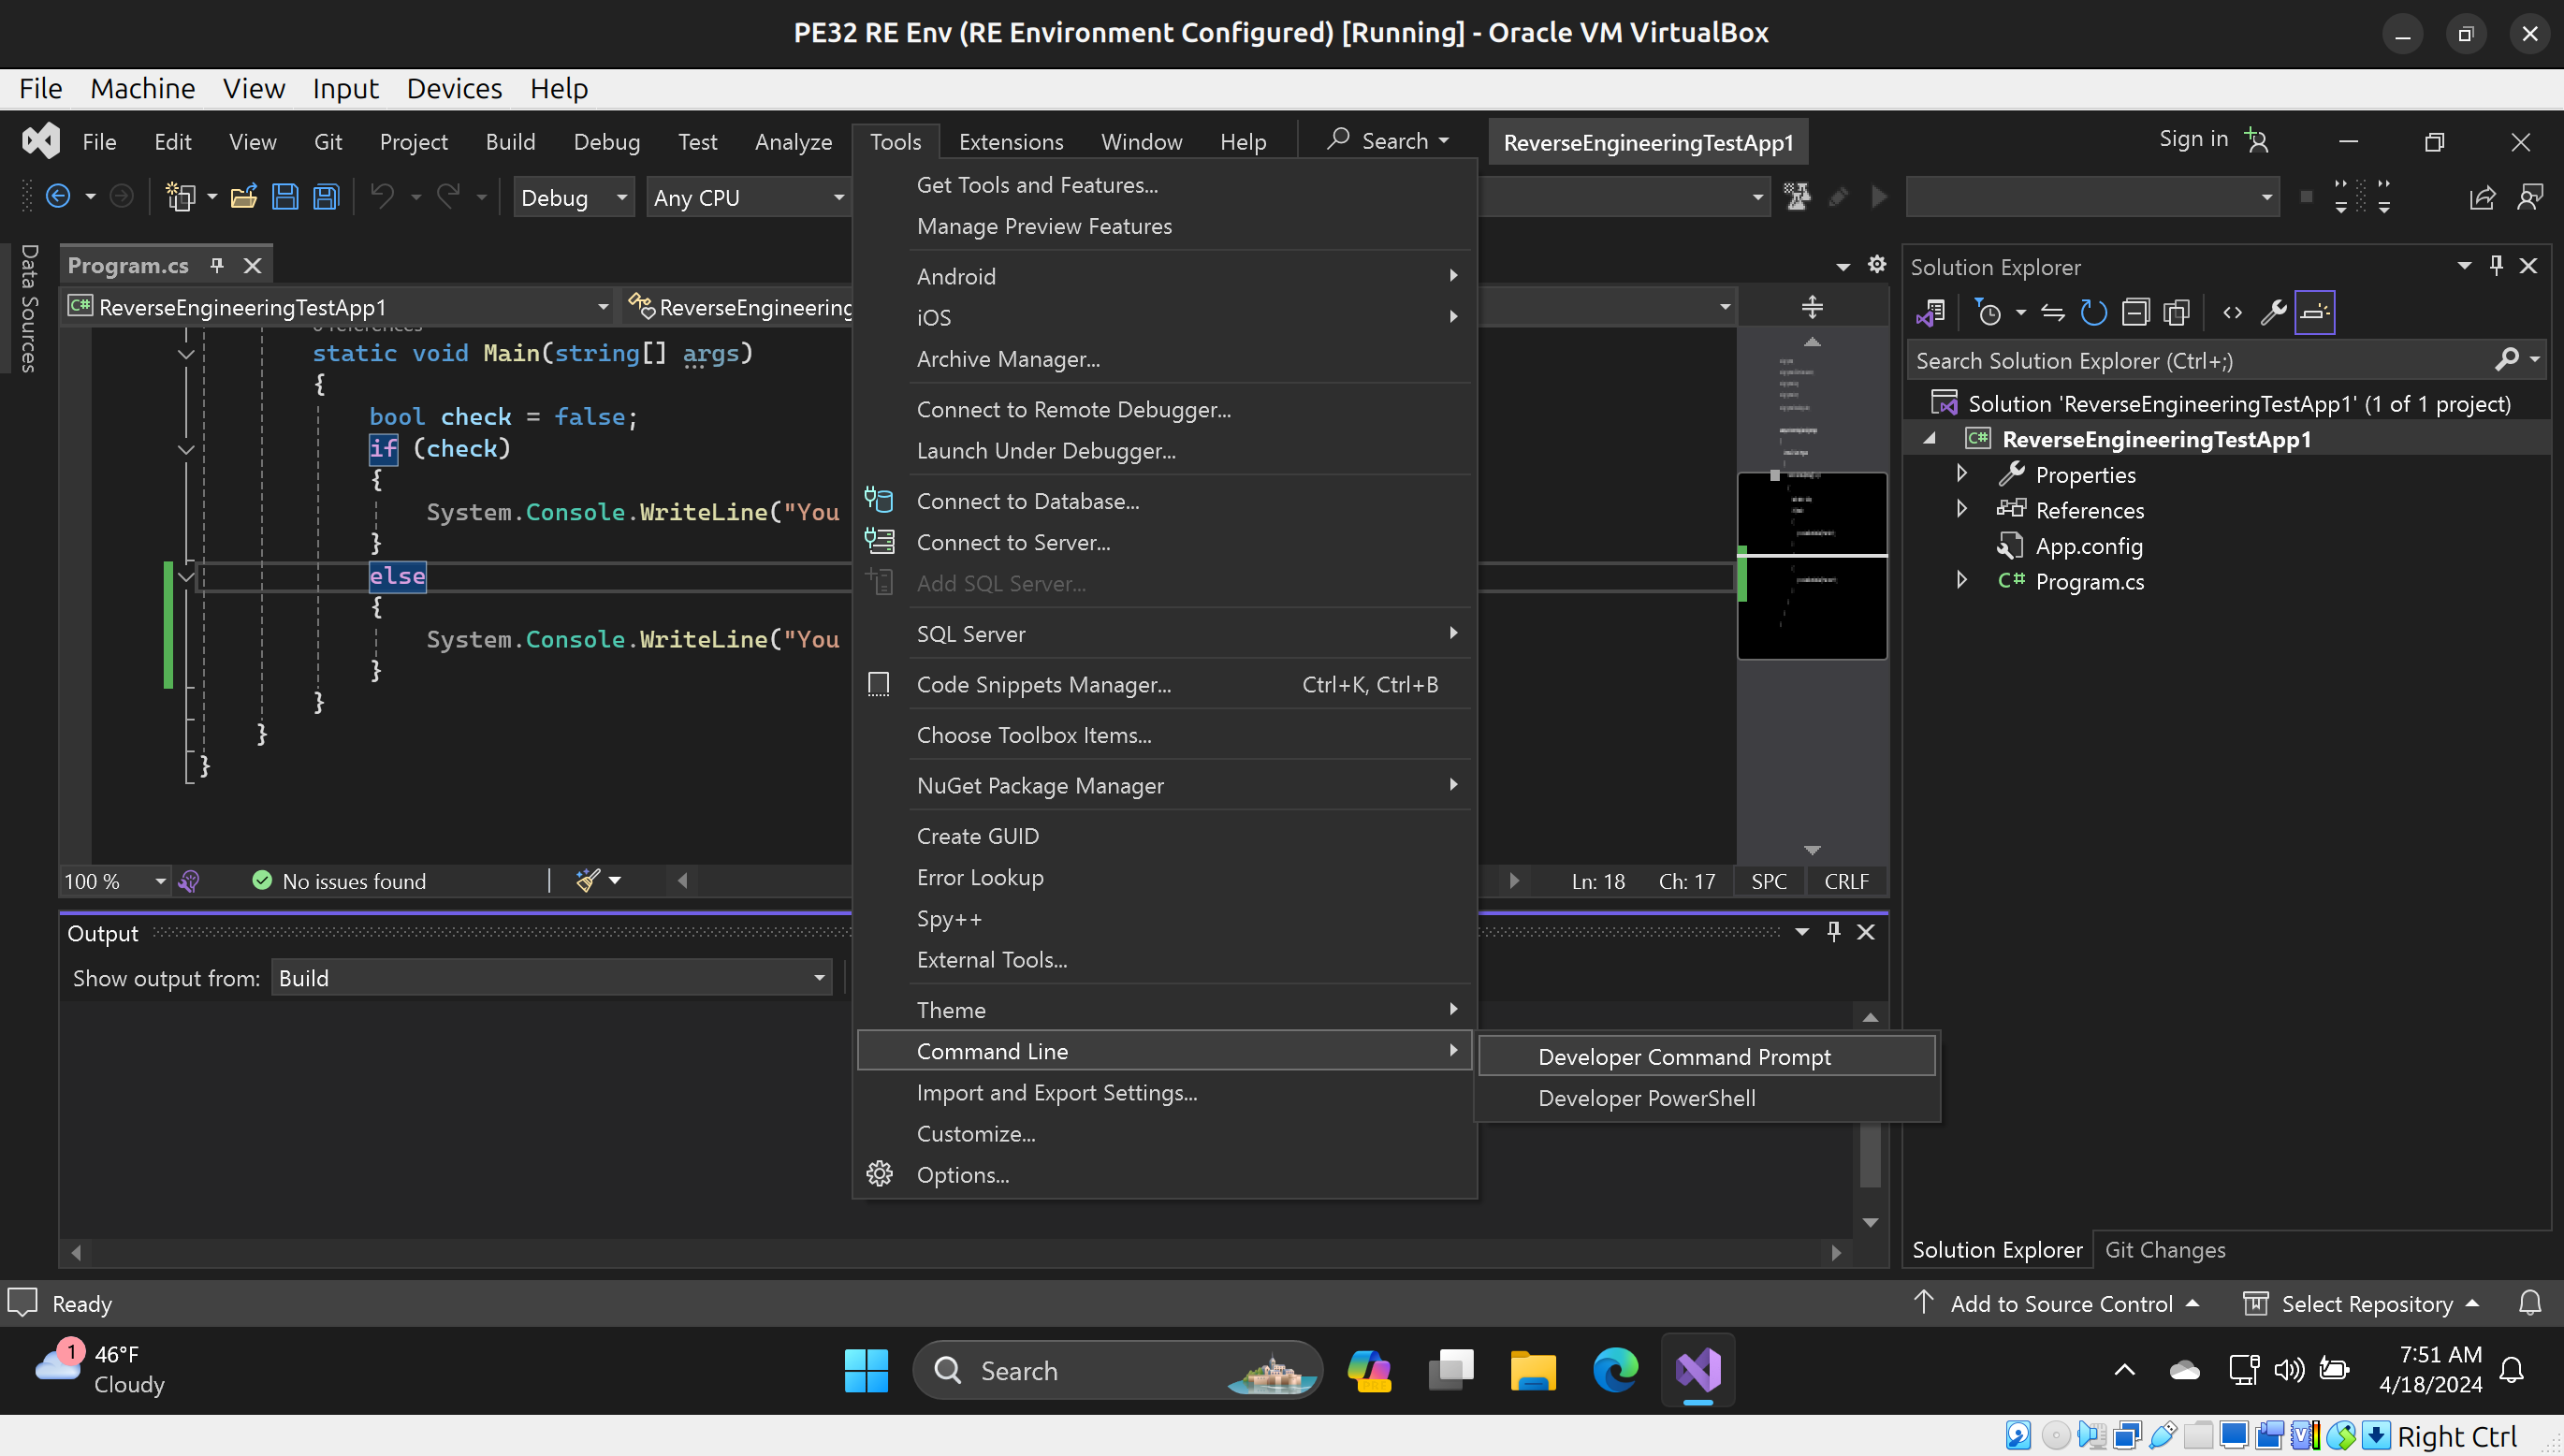
You should see a cmd.exe-like shell that has special Visual Studio Applications installed on the PATH.

Now we need to cd ReverseEngineeringTestApp1\bin\Debug and then run dir in that directory.

In text, here is the input/output from the above image.
C:\Users\stark\source\repos\ReverseEngineeringTestApp1>dir

Directory of C:\Users\stark\source\repos\ReverseEngineeringTestApp1                                                          04/18/2024  07:53 AM
<DIR>          .    04/14/2024  07:32 AM
<DIR>          ..   04/18/2024  07:40 AM
<DIR>          ReverseEngineeringTestApp1   04/14/2024  07:32 AM
               1,184 ReverseEngineeringTestApp1.sln
               1 File(s) 1,184 bytes
               3 Dir(s)  98,341,535,744 bytes free

C:\Users\stark\source\repos\ReverseEngineeringTestApp1>cd ReverseEngineeringTestApp1\bin\Debug

C:\Users\stark\source\repos\ReverseEngineeringTestApp1\ReverseEngineeringTestApp1\bin\Debug> Directory of C:\Users\stark\source\repos\ReverseEngineeringTestApp1\ReverseEngineeringTestApp1\bin\Debug

04/18/2024  07:43 AM    <DIR>          .    04/14/2024  07:32 AM
                        <DIR>          ..   04/18/2024  07:43 AM
                        5,120 ReverseEngineeringTestApp1.exe 04/14/2024  07:32 AM
                        187 ReverseEngineeringTestApp1.exe.config   04/14/2024  07:45 AM
                        6,184 ReverseEngineeringTestApp1.il 04/18/2024  07:43 AM
                        22,016 ReverseEngineeringTestApp1.pdb 04/14/2024  07:41 AM
                        1,528 ReverseEngineeringTestApp1.res 04/14/2024  07:46 AM
Disassembly
Now we want to convert our .NET Executable (ReverseEngineeringTestApp1.exe) into MSIL.
We can do that by using ildasm. More information on ildasm can be found here: https://learn.microsoft.com/en-us/dotnet/framework/tools/ildasm-exe-il-disassembler
So from our Visual Studio Developer Command Prompt, we run:
ildasm /out=ReverseEngineeringTestApp1.il ReverseEngineeringTestApp1.exe
This will write the human-readable MSIL to the file ReverseEngineeringTestApp1.il
Now when we look at this text files, this is the contents:
//  Microsoft (R) .NET Framework IL Disassembler.  Version 4.8.3928.0
//  Copyright (c) Microsoft Corporation.  All rights reserved.


// Metadata version: v4.0.30319
.assembly extern mscorlib
{
  .publickeytoken = (B7 7A 5C 56 19 34 E0 89 )                         // .z\V.4..
  .ver 4:0:0:0
}
.assembly ReverseEngineeringTestApp1
{
  .custom instance void [mscorlib]System.Runtime.CompilerServices.CompilationRelaxationsAttribute::.ctor(int32) = ( 01 00 08 00 00 00 00 00 )
  .custom instance void [mscorlib]System.Runtime.CompilerServices.RuntimeCompatibilityAttribute::.ctor() = ( 01 00 01 00 54 02 16 57 72 61 70 4E 6F 6E 45 78   // ....T..WrapNonEx
                                                                                                             63 65 70 74 69 6F 6E 54 68 72 6F 77 73 01 )       // ceptionThrows.

  // --- The following custom attribute is added automatically, do not uncomment -------
  //  .custom instance void [mscorlib]System.Diagnostics.DebuggableAttribute::.ctor(valuetype [mscorlib]System.Diagnostics.DebuggableAttribute/DebuggingModes) = ( 01 00 07 01 00 00 00 00 )

  .custom instance void [mscorlib]System.Reflection.AssemblyTitleAttribute::.ctor(string) = ( 01 00 1A 52 65 76 65 72 73 65 45 6E 67 69 6E 65   // ...ReverseEngine
                                                                                              65 72 69 6E 67 54 65 73 74 41 70 70 31 00 00 )    // eringTestApp1..
  .custom instance void [mscorlib]System.Reflection.AssemblyDescriptionAttribute::.ctor(string) = ( 01 00 00 00 00 )
  .custom instance void [mscorlib]System.Reflection.AssemblyConfigurationAttribute::.ctor(string) = ( 01 00 00 00 00 )
  .custom instance void [mscorlib]System.Reflection.AssemblyCompanyAttribute::.ctor(string) = ( 01 00 00 00 00 )
  .custom instance void [mscorlib]System.Reflection.AssemblyProductAttribute::.ctor(string) = ( 01 00 1A 52 65 76 65 72 73 65 45 6E 67 69 6E 65   // ...ReverseEngine
                                                                                                65 72 69 6E 67 54 65 73 74 41 70 70 31 00 00 )    // eringTestApp1..
  .custom instance void [mscorlib]System.Reflection.AssemblyCopyrightAttribute::.ctor(string) = ( 01 00 12 43 6F 70 79 72 69 67 68 74 20 C2 A9 20   // ...Copyright ..
                                                                                                  20 32 30 32 34 00 00 )                            //  2024..
  .custom instance void [mscorlib]System.Reflection.AssemblyTrademarkAttribute::.ctor(string) = ( 01 00 00 00 00 )
  .custom instance void [mscorlib]System.Runtime.InteropServices.ComVisibleAttribute::.ctor(bool) = ( 01 00 00 00 00 )
  .custom instance void [mscorlib]System.Runtime.InteropServices.GuidAttribute::.ctor(string) = ( 01 00 24 63 30 30 30 37 65 30 62 2D 65 31 34 65   // ..$c0007e0b-e14e
                                                                                                  2D 34 66 33 65 2D 62 38 36 36 2D 35 61 35 63 33   // -4f3e-b866-5a5c3
                                                                                                  63 63 64 38 63 66 30 00 00 )                      // ccd8cf0..
  .custom instance void [mscorlib]System.Reflection.AssemblyFileVersionAttribute::.ctor(string) = ( 01 00 07 31 2E 30 2E 30 2E 30 00 00 )             // ...1.0.0.0..
  .custom instance void [mscorlib]System.Runtime.Versioning.TargetFrameworkAttribute::.ctor(string) = ( 01 00 1A 2E 4E 45 54 46 72 61 6D 65 77 6F 72 6B   // ....NETFramework
                                                                                                        2C 56 65 72 73 69 6F 6E 3D 76 34 2E 38 01 00 54   // ,Version=v4.8..T
                                                                                                        0E 14 46 72 61 6D 65 77 6F 72 6B 44 69 73 70 6C   // ..FrameworkDispl
                                                                                                        61 79 4E 61 6D 65 12 2E 4E 45 54 20 46 72 61 6D   // ayName..NET Fram
                                                                                                        65 77 6F 72 6B 20 34 2E 38 )                      // ework 4.8
  .hash algorithm 0x00008004
  .ver 1:0:0:0
}
.module ReverseEngineeringTestApp1.exe
// MVID: {F0887454-1D3B-4B4E-86E0-6DCFCFB45188}
.imagebase 0x00400000
.file alignment 0x00000200
.stackreserve 0x00100000
.subsystem 0x0003       // WINDOWS_CUI
.corflags 0x00020003    //  ILONLY 32BITPREFERRED
// Image base: 0x00E00000


// =============== CLASS MEMBERS DECLARATION ===================

.class private auto ansi beforefieldinit ReverseEngineeringTestApp1.Program
       extends [mscorlib]System.Object
{
  .method private hidebysig static void  Main(string[] args) cil managed
  {
    .entrypoint
    // Code size       37 (0x25)
    .maxstack  1
    .locals init ([0] bool check,
             [1] bool V_1)
    IL_0000:  nop
    IL_0001:  ldc.i4.0
    IL_0002:  stloc.0
    IL_0003:  ldloc.0
    IL_0004:  stloc.1
    IL_0005:  ldloc.1
    IL_0006:  brfalse.s  IL_0017

    IL_0008:  nop
    IL_0009:  ldstr      "You Win!"
    IL_000e:  call       void [mscorlib]System.Console::WriteLine(string)
    IL_0013:  nop
    IL_0014:  nop
    IL_0015:  br.s       IL_0024

    IL_0017:  nop
    IL_0018:  ldstr      "You Lose!!"
    IL_001d:  call       void [mscorlib]System.Console::WriteLine(string)
    IL_0022:  nop
    IL_0023:  nop
    IL_0024:  ret
  } // end of method Program::Main

  .method public hidebysig specialname rtspecialname
          instance void  .ctor() cil managed
  {
    // Code size       8 (0x8)
    .maxstack  8
    IL_0000:  ldarg.0
    IL_0001:  call       instance void [mscorlib]System.Object::.ctor()
    IL_0006:  nop
    IL_0007:  ret
  } // end of method Program::.ctor

} // end of class ReverseEngineeringTestApp1.Program


// =============================================================

// *********** DISASSEMBLY COMPLETE ***********************
// WARNING: Created Win32 resource file ReverseEngineeringTestApp1.res
There is a lot going on here! Really what we care about is where the lines start with IL_. Let’s look at IL_0006:
IL_0006: brfalse.s IL_0017
This MSIL assembly essentially means “branch if false to IL_0017”. IL_0017 is the instruction sequence for handling the You Lose!! text which is outputted to the console. What we want to do to “win” is modify IL_0006 to the following instruction:
IL_0006: brfalse.s IL_0008
So let’s make that change to ReverseEngineeringTestApp1.il and save the file.
Re-assembly
Now we need to re-assemble the ReverseEngineeringTestApp1.il file back into ReverseEngineeringTestApp2.exe. We can do that with ilasm.exe from the Visual Studio Developer Command Prompt. More information on ilasm.exe can be found here: https://learn.microsoft.com/en-us/dotnet/framework/tools/ilasm-exe-il-assembler
The command we need to run is:
ilasm /out=ReverseEngineeringTestApp2.exe ReverseEngineeringTestApp1.il
Now, when we run ReverseEngineeringTestApp2.exe, we win!
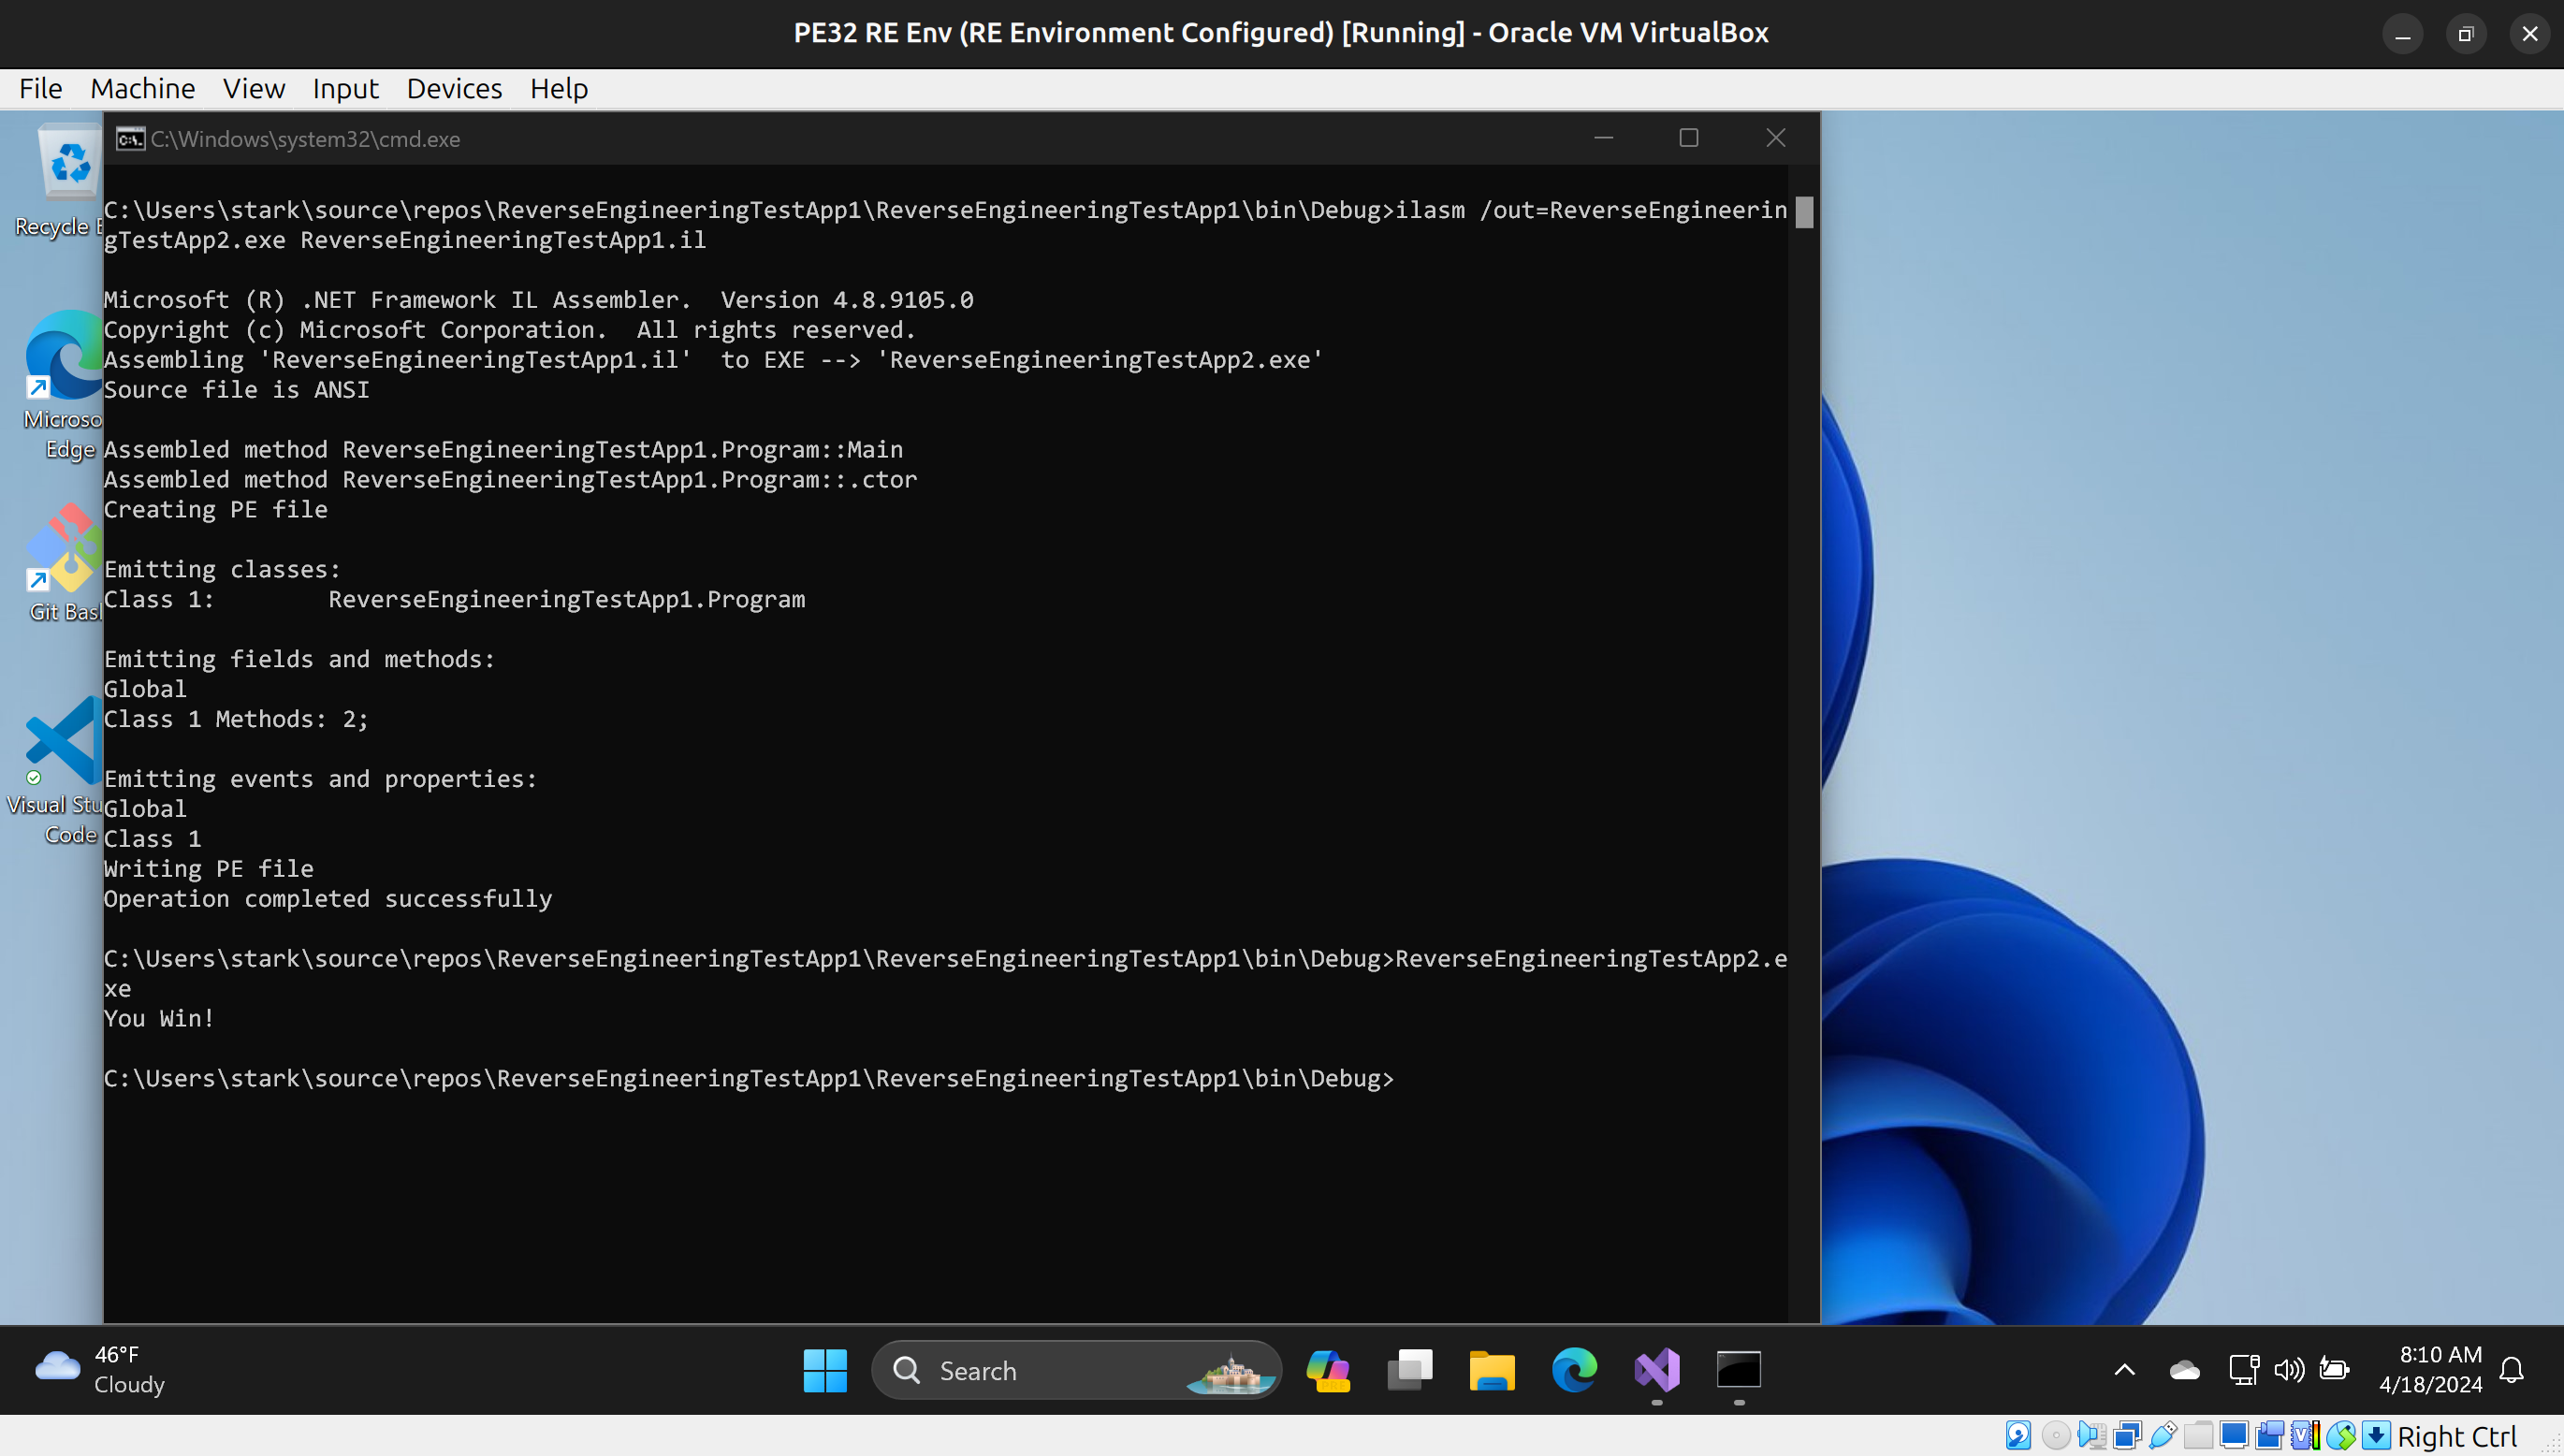
Text output:
C:\Users\stark\source\repos\ReverseEngineeringTestApp1\ReverseEngineeringTestApp1\bin\Debug>ilasm /out=ReverseEngineeringTestApp2.exe ReverseEngineeringTestApp1.il

Microsoft (R) .NET Framework IL Assembler.  Version 4.8.9105.0
Copyright (c) Microsoft Corporation.  All rights reserved.
Assembling 'ReverseEngineeringTestApp1.il'  to EXE --> 'ReverseEngineeringTestApp2.exe'
Source file is ANSI

Assembled method ReverseEngineeringTestApp1.Program::Main
Assembled method ReverseEngineeringTestApp1.Program::.ctor
Creating PE file

Emitting classes:
Class 1:        ReverseEngineeringTestApp1.Program

Emitting fields and methods:
Global
Class 1 Methods: 2;

Emitting events and properties:
Global
Class 1
Writing PE file
Operation completed successfully

C:\Users\stark\source\repos\ReverseEngineeringTestApp1\ReverseEngineeringTestApp1\bin\Debug>ReverseEngineeringTestApp2.exe
You Win!
Decompiler
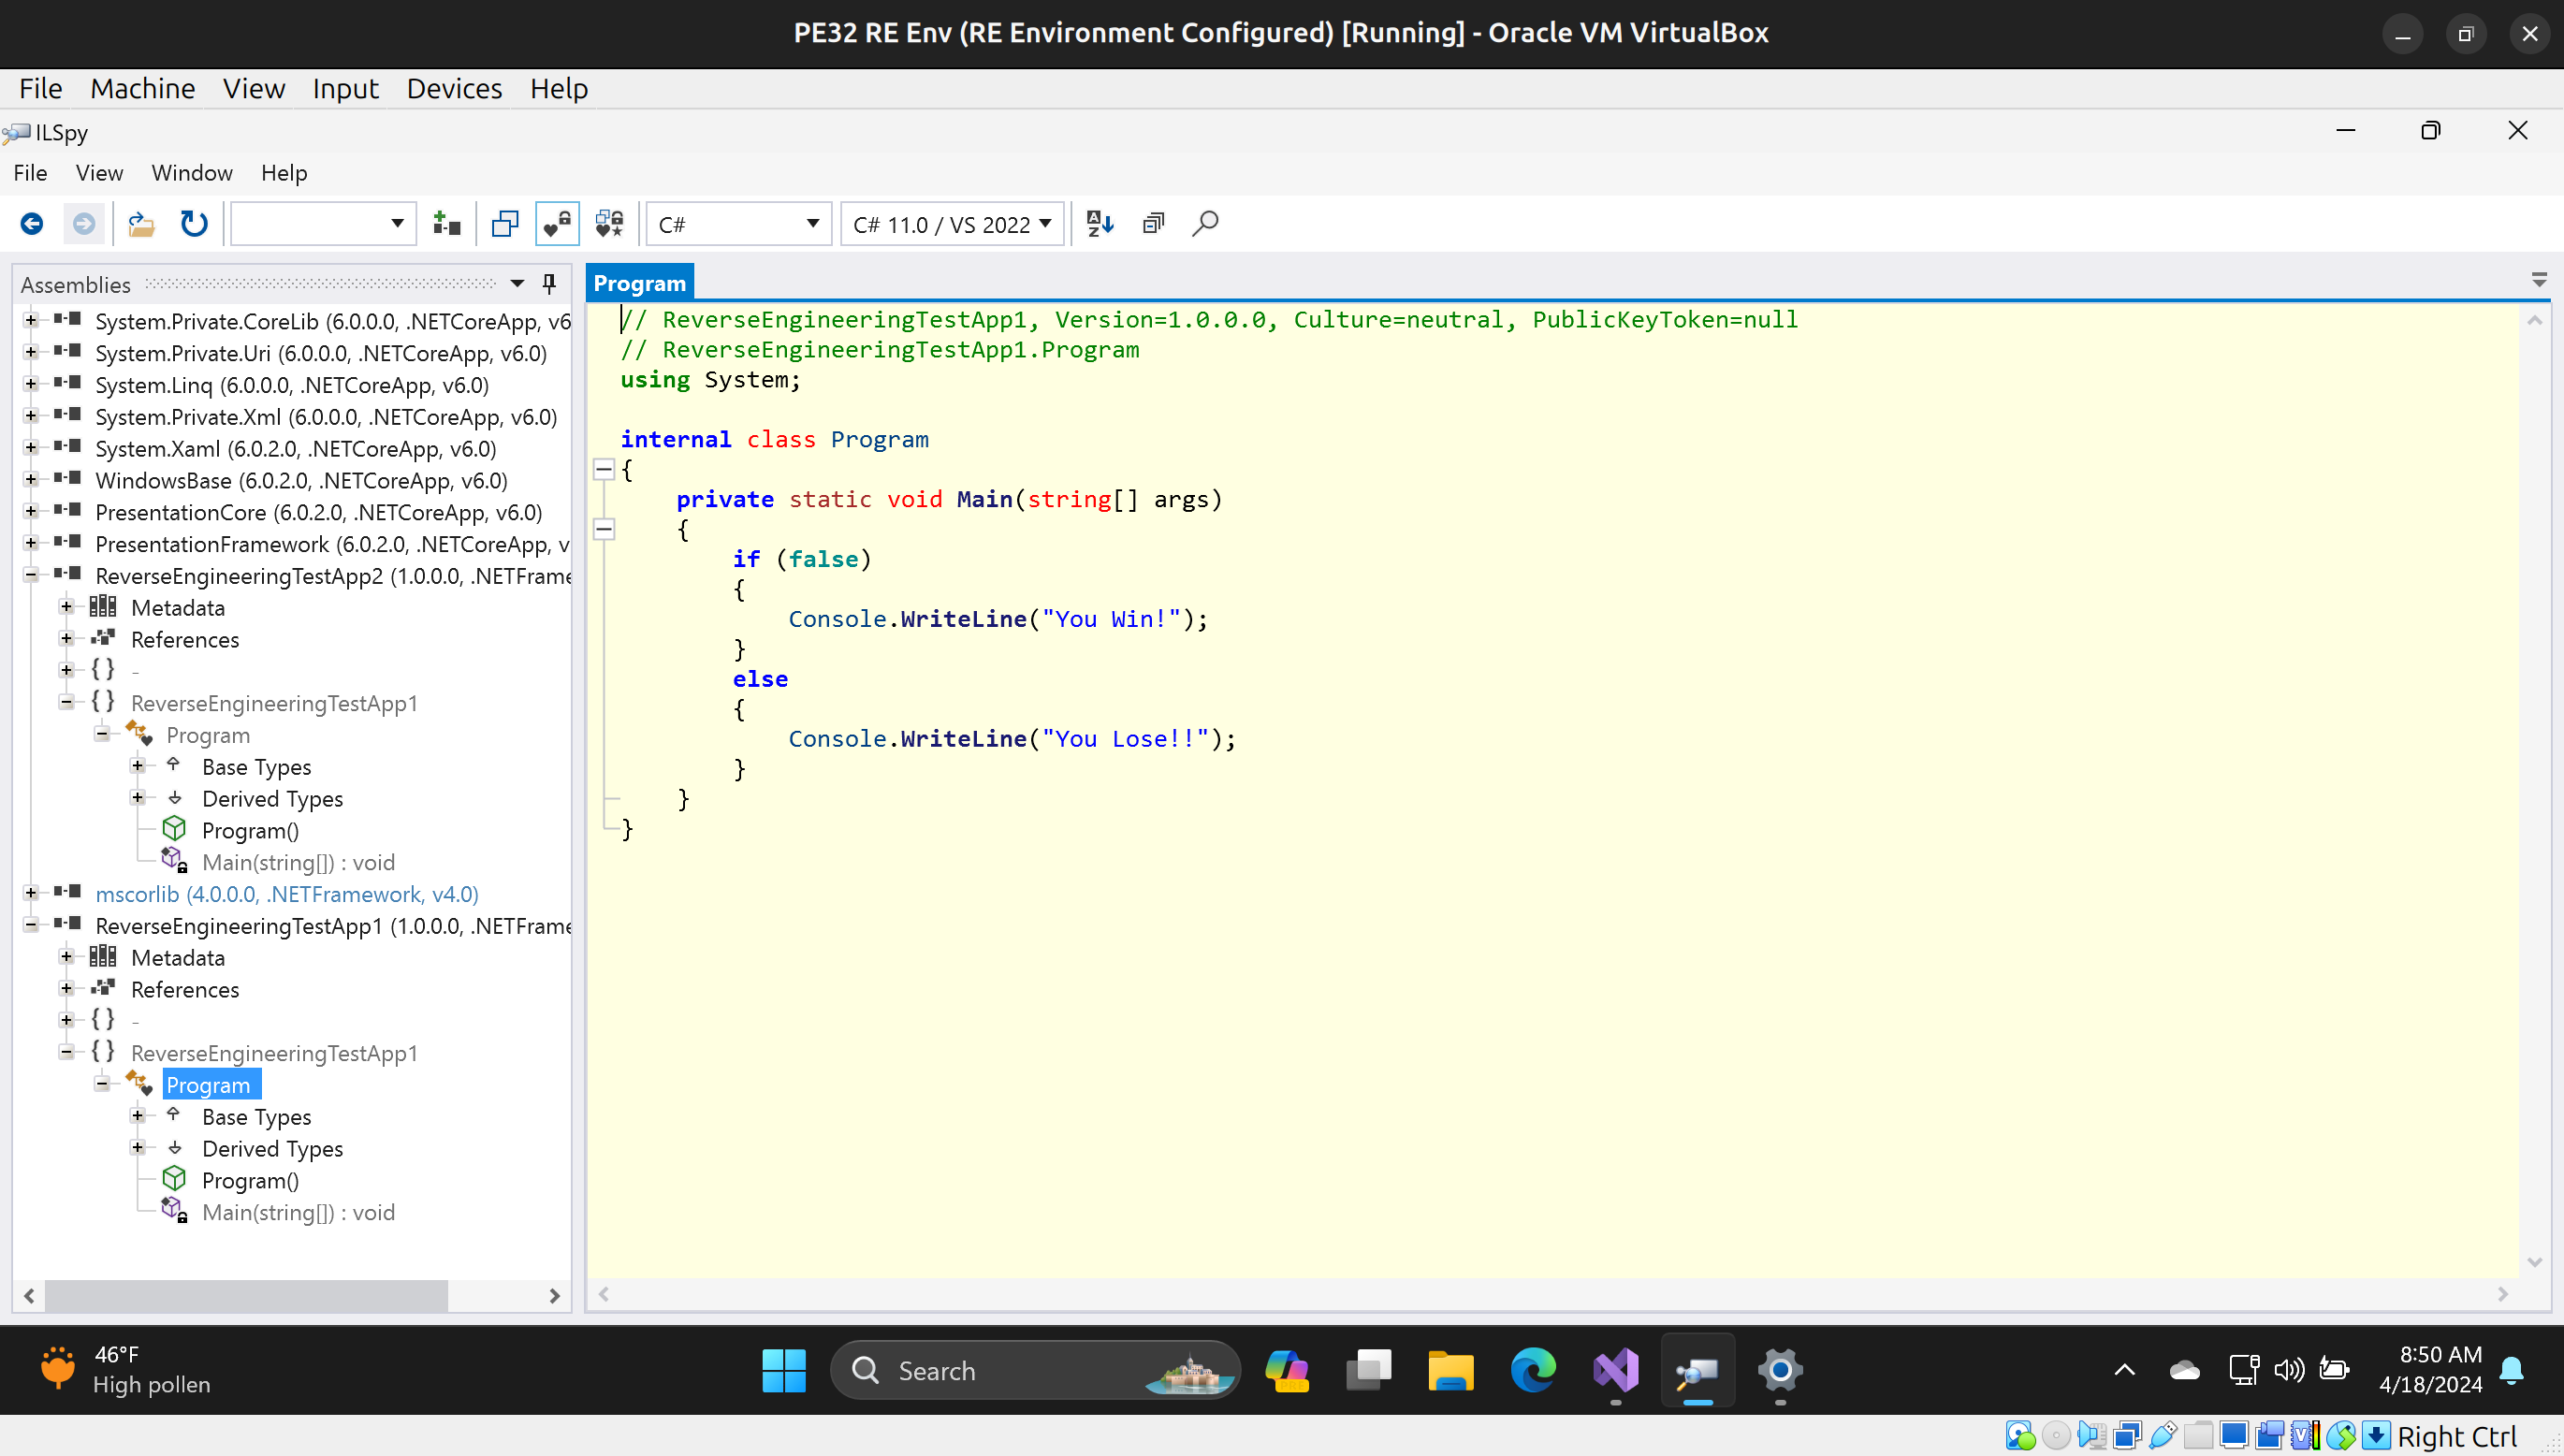
Now, let’s look at our original and modified .exe files using a decompiler such as ILSpy
Original:
Modified:
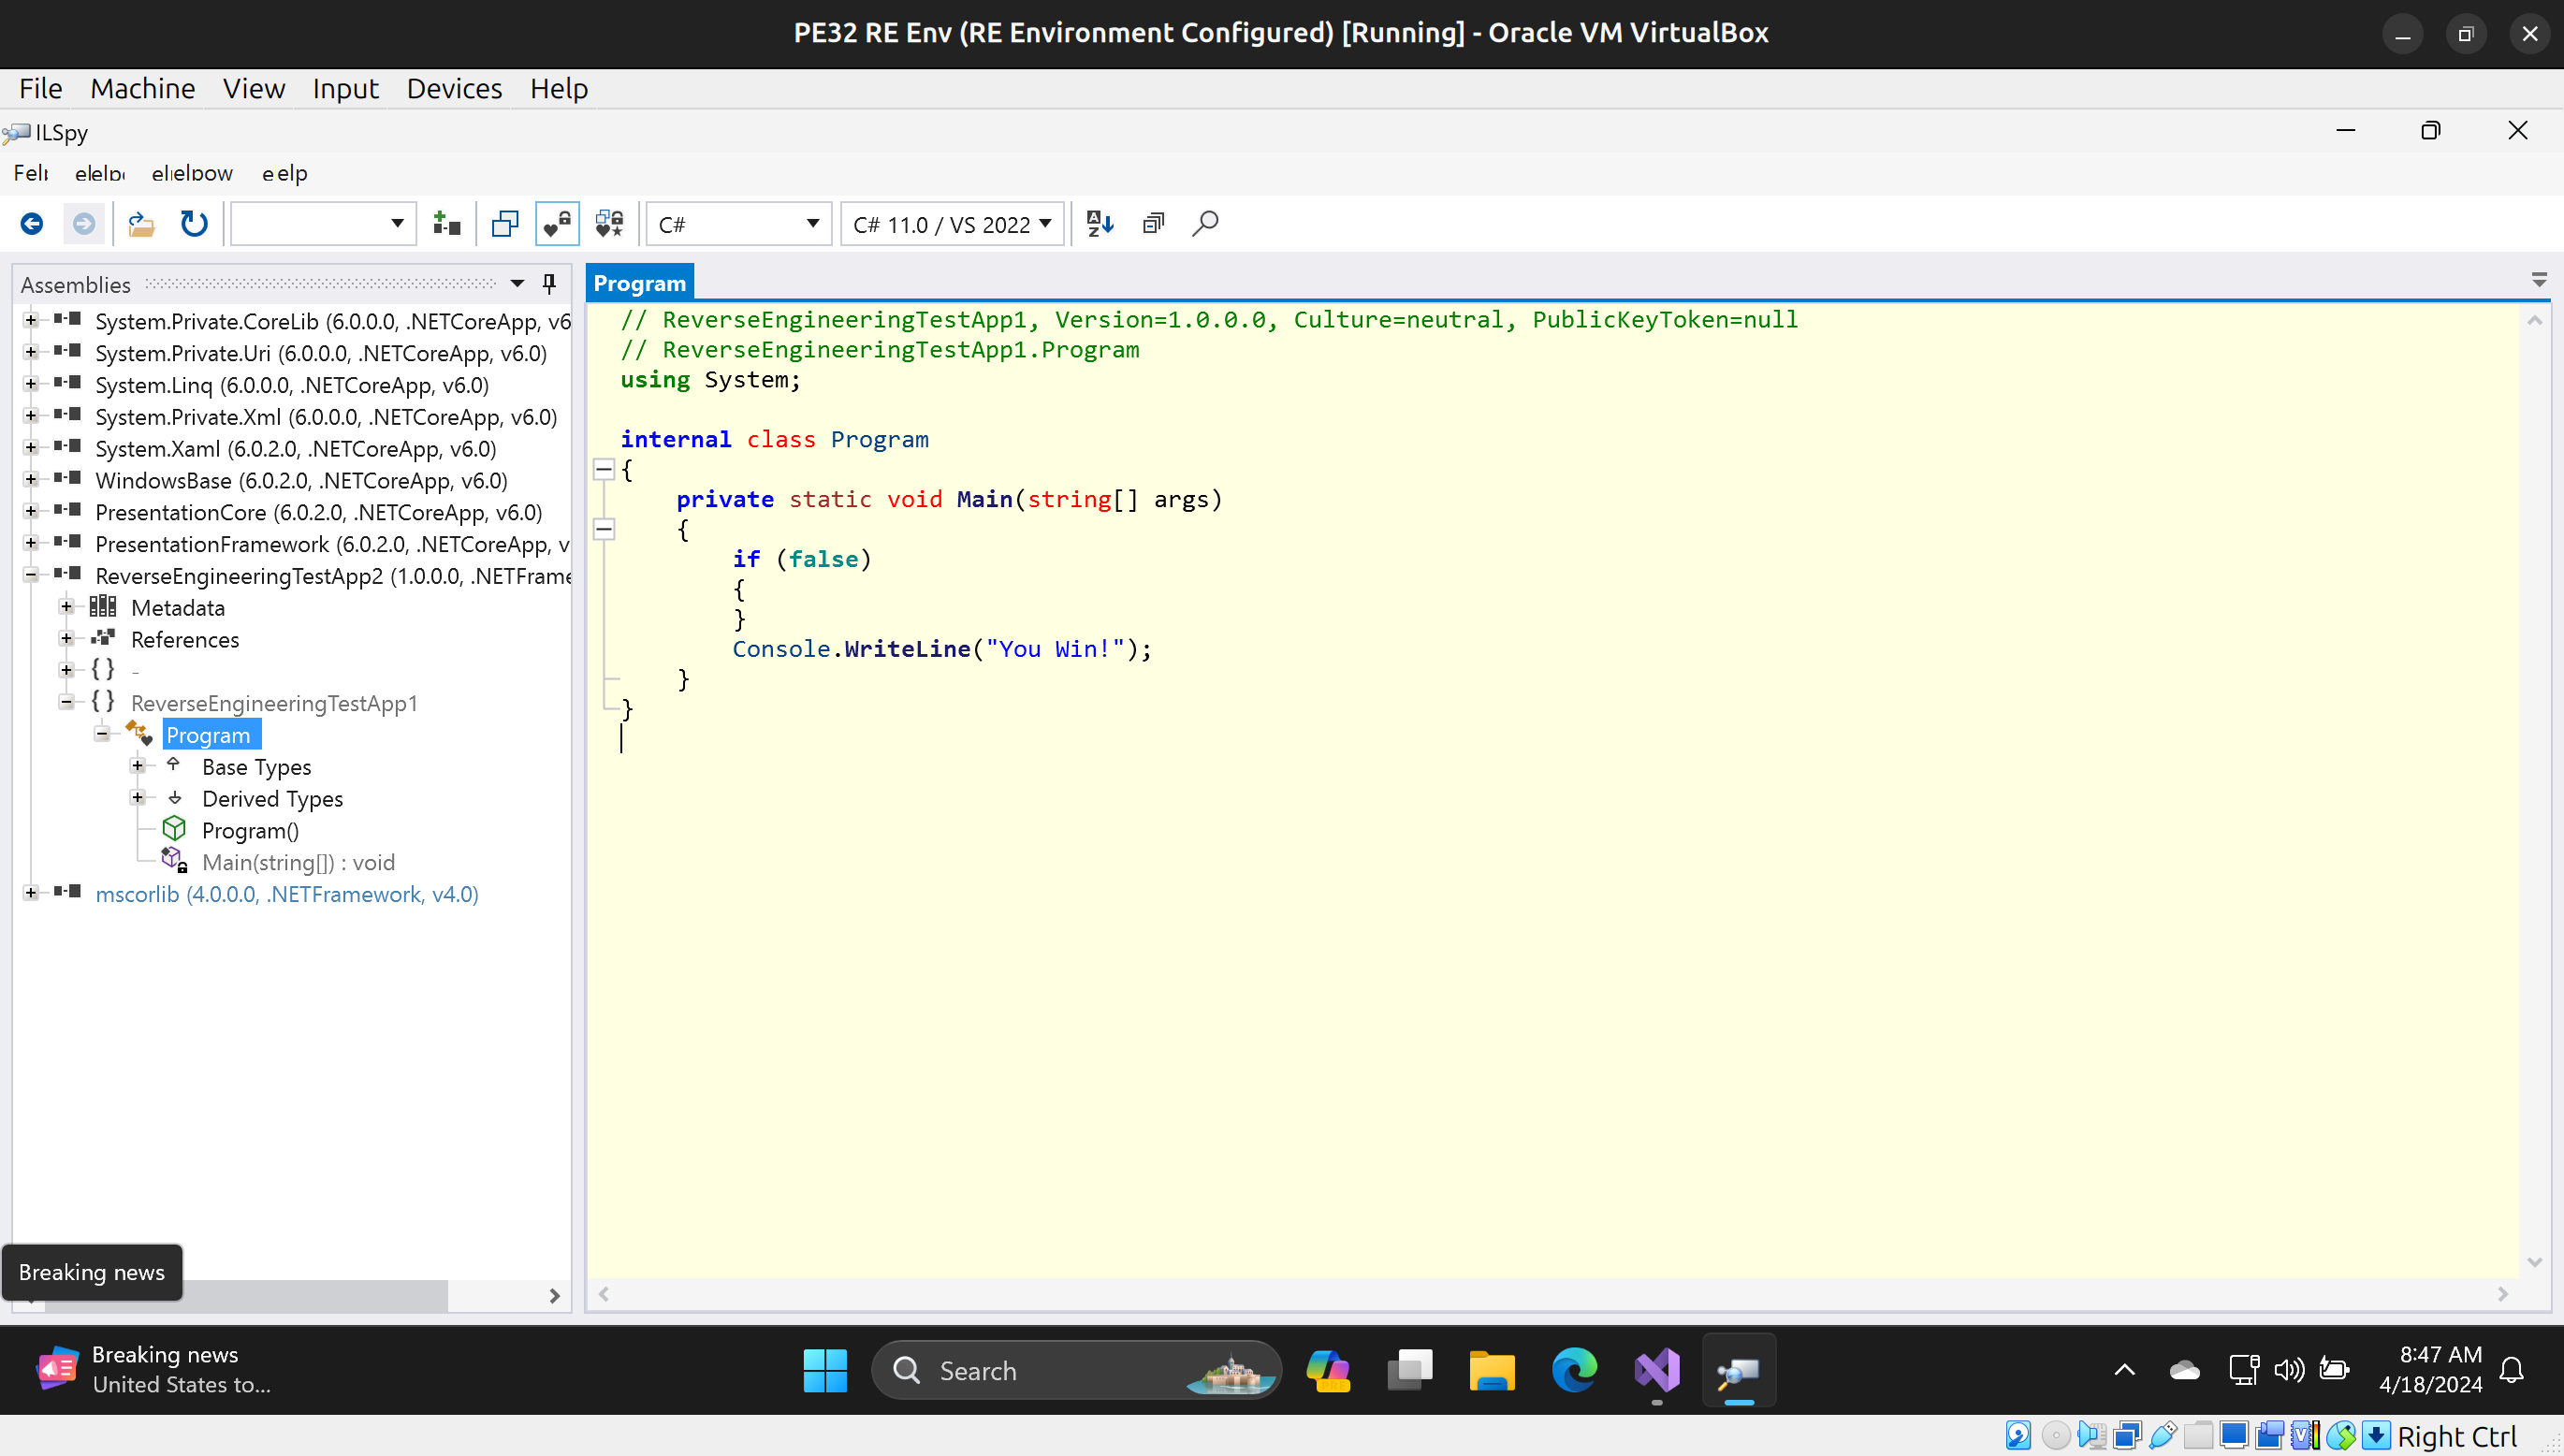
As you can see, we have modified the logic of the program according to ILSpy
Conclusion
In this Blog Post I showed the basic tooling and process necessary for reverse engineering and modify in binary form a .NET application. It should be noted this same flow will work for C# and VB.NETas they both compile down to MSIL.