ONN Laptop BIOS Exploration

Introduction
I recently acquired an ONN Laptop. This is a brand of laptop sold exclusively through Walmart in the US.
I decided to investigate this laptop because I had a suspicion it’s BIOS was not particularly locked down. Turns out my suspicion was well founded; this article will describe the various configuration settings made available through BIOS on the ONN Laptop.
I was unable to conduct extensive vulnerability testing with this laptop as by setting a particular BIOS option, through the built-in BIOS Configuration Utility nonetheless, I bricked the laptop. Read the analysis section for more information, where I also list out the various attacker vectors I identified.
Analysis
Through the configuration menus listed below it is possible to enable Intel DCI without making any custom modifications to the BIOS image using a tool such as RU.efi. This means it is possible to enable Intel DCI without disabling and re-enabling Secure Boot. I was able to connect the laptop to a host system running Intel System Debugger (legacy) and successfully halt the laptop’s processor and see the system state, as well as perform some rudimentary debugging at this level.
The interesting functions of the BIOS - specifically the network enabled capabilities, do not seem to function properly. Every time I tried setting a boot URI in the UEFI HTTP IPv4 configuration menu, the option value reset to blank every time I saved the BIOS configuration.
Several other options, such as ASF Support in Advanced / AMT Configuration also displayed this behavior. When I set ASF Support to enabled, saved, and then exited the BIOS, on the very next entry into BIOS the ASF Support option was set to disabled.
I was able to get the WiFi configuration to successfully authenticate to the WiFi network, but the device never responded to ICMP or other IP level messages. It seems like there is some Layer 2 attack surface here in terms of authenticating to the WiFi access point, which may be the only “remote” attack vector. This still would require local proximity to the device.
Other interesting input includes the Cert Enrollment option in the Advanced / TLS Configuration menu. This allows certificates to be loaded from USB storage, which invites some unique opportunities, given physical access.
There of course are the UEFI NVRAM variables as potential vectors to supply malicious input. I did not explore this avenue beyond setting options in the BIOS configuration utility.
Also worth noting is that the Firmware Configuration Menu contains an option for Ignore Policy Update - when I set this to be the configured option, the laptop would no longer boot, not even to BIOS, resulting in a bricked laptop. It looks like the BIOS manufacturer attempted to warn users about setting this option, but it was not clear to me that setting this option as the configured value would have the effect of bricking the laptop.
I might have been able to restore the laptop to a functional state if I had made a back up of the SPI ROM prior to testing; I did not do this, foolishly not thinking that there could be any way to permanently brick the laptop through BIOS shy of powering off the device during a firmware update. Certainly I did not anticipate a configurable option placing the laptop in such a state.
The best advice I can offer users of this laptop is that they set the User Password under the Security Menu - this will require a password to POST as well as access BIOS settings. I’m not convinced that there isn’t a way to bypass this authentication mechanism, but it is better than nothing. Like most devices, physical access to this device essentially means game over in terms of security - by allowing debug capabilities it is possible to manipulate the laptop at the platform level.
Below is a run through of the BIOS Configuration Utility menus. Note that except for one or two special instances, the values in the images for the various settings are the default values.
Main Menu

This is the first screen the user is greeted with upon entering system BIOS. The user can enter the system BIOS by pressing the Delete button at the ONN splash screen. It contains version information for the currently install BIOS image.
There are six total menus:
- Main
- Advanced
- Chipset
- Security
- Boot
- Save & Exit
Advanced Menu
The advanced menu is where most BIOS configuration options are set. This includes the following sub-menus:
- RC ACPI Settings
- Connectivity Settings
- CPU Configuration
- PCH-FW Configuration
- Thermal Configuration
- Platform Settings
- ACPI D3Cold Settings
- Overclocking PErformance Menu
- AMT Configuration
- Intel ICC
- Thunderbolt(TM) Configuration
- Debug Settings
- Trusted Computing
- ACPI Settings
- SMART Settings
- S5 RTC Wake Settings
- Serial Port Console Redirection
- Intel TXT Information
- Acoustic Management Configuration
- Switchable Graphics
- AMI Graphic Output Protocol Policy
- SIO Configuration (Non-functional)
- PCI Subsystem Settings
- USB Configuration
- CSM Configuration
- NVMe Configuration
-
SDIO Configuration
- Network Stack Configuration
- Tls Auth Configuration
- RAM Disk Configuration
There are a few additional Networking menus that appear once Network Stack is enabled and the BIOS settings have been saved and the system reset. Those are:
- Wi-Fi Configuration
- VLAN Configuration
MAC:<MACADDRESS>-IPv4 Network ConfigurationMAC:<MACADDRESS>-HTTP Boot ConfigurationMAC:<MACADDRESS>-IPv6 Network Configuration
We will explore these last five menus near the end of this post.
Advanced / RC ACPI Settings

This seems to be a power management and monitoring subsystem of the chipset. It contains a number of sub-menus:
- PTID Support
- PECI Access Method
- Native PCIE Enable
-
Native ASPM
- Wake system from S5
- ACPI Debug
-
Lower Power SO Idle Capability
-
Intel Ready Mode Technology
- PCI Delay Optimization
- MSI Enabled
Advanced / Connectivty Menu

The Advanced / Connectivity Menu is used to configure onboard chip detection for communications chips, such as Bluetooth and WWAN.
Advanced / CPU Configuration Menu

The Advanced / CPU Configuration menu details the L1-L4 cache information, as well as the processor ID and speed. Additioanlly, virtualization can be configured through this menu.
Advanced / Power & Performance Menu

The Power & Performance Menu allows the user to configure CPU and GT power options.
Advanced / PCH Menu

The PCH Menu includes information on Intel ME, including version information. It allows various ME options to be set, including ME debug options.
Advanced / PCH Menu / ME Debug Settings

These are options for debugging Intel Management Engine. They include:
- HECI Timeouts
- Force ME DID Init Status
- CPU Replaced Polling Disable
- ME DID Message
- HECI Retry Disable
- HECI Message check Disable
- MBP HOB Skip
- HECI2 Interface Communication
- KT Device
- End of Post Message
- DOI3 Setting for HECI Disable
- MCTP Broadcast Cycle
Advanced / Thermal Configuration Menu

The Advanced / Thermal Configuration Menu allows thermal configuration of CPU, Platform, and DPTF.
Advanced / Platform Settings Menu

The Advanced / Platform Settings Menu contains the following options:
- UCSI Retry Mechanism
- PS2 Keyboard and Mouse
- Charging Method
- Pmic Vcc IO Level
- Pmic Vddq Level
- Power Sharing Manager
- Enable FFU Support
- Enable PowerMeter
- VTIO
- HID Event Filter Driver
- HEBC value
- Pcie Slot 1 to x4 Mode Rework
- PCIe x16 slot GSPIO_CLK Rework
- PCIe x16 slot GSXDOUT Rework
- System Time and Alarma Source
Advanced / D3Cold Settings Menu

The Advanced / D3 Cold Settings Menu includes the following options:
- ACPI D3Cold Support
- VR Ramp up delay
- PCIE Slot 5 Device Power-on delay in MS
- Audio Delay
- SensorHub
- TouchPad
- TouchPanel
- P-state Capping
- USB Port 1
- USB Port 2
- WWAN
- Sata Port 0
- Sata Port 1
- Sata Port 2
- Sata Port 3
- Sata Port 4
- Sata Port 5
- PCIe Remapped CR1
- PCIe Remapped CR2
- PCIe Remapped CR3
Advanced / Overclocking Configuration Menu

The Advanced / Overclocking Menu allows the ability to enable/disable overclocking on the platform.
Advanced / Intel AMT Menu

The Advanced / Intel AMT Menu contains configuration options for Intel Active Management Technology. We will explore this capability further in the analysis section of this post.
The configuration options for this menu include:
- ASF Support
- USB Provisioning of AMT
- CIRA Configuration
- ASF Configuration
- Secure Erase Configuration
- OEM Flags Settings
- MEBx Resolution Settings
Advanced / Intel ICC Menu

The Advanced / Intel ICC Menu includes the following configuration options:
- ICC/OC Watchdog Timer
- ICC Profile
- ICC PLL Shutdown
The following configuration information is also presented:
- BCLK Clock Settings
- Default Clock Settings
- Frequency Range Limits
- Maximum Spread %
- Spread Mode Adjustments
- Clock Frequency
- Bclk Change Permanent
- Spread %
Advanced / ThunderBolt(TM) Menu

This menu allows the user to enabled/disable ThunderBolt(TM) support.
Advanced / Debug Settings Menu

This menu allows a user to configure Intel DCI, amongst other platform configuration options. The sub options in this menu are:
- Kernel Debug Serial Port
- Platform Debug Consent
- Advanced Debug Settings
Advanced / Debug Settings Menu / Platform Debug Consent:
The options in this menu include:
- Disable
Enabled (DCI OOB+[DbC])- Enabled (DCI OOB)
- Enabled (USB3 DbC)
- Enabled (USB3 DbC)
- Enabled (XDP/MIPI60)
I have set this option to Enabled (DCI OOB) so we can use DCI to debug the platform. More information on this will be provided in the analysis section.
Advanced / Debug Settings Menu / Advanced Debug Menu

The Advanced / Debug Settings Menu / Advanced Debug Menu options are:
- USB 3 Type-C UFP2DFP Kernel/Platform Debug Support
- SLP_SO# Override
- SOix Override Settings
- USB Overcurrent Override for DbC
- CPU Run Control
- CPU Run Control Lock
- PCH Trace Hub Enable Mode
- PCH TH Mem Buffer Size 0
- PCH TH Mem Buffer Size 1
- Processor trace memory allocation
- JTAG C10 Power Gate
- Three Strikes Counter
- CrashLog Feature
- CrashLog On All Reset
- PMC Debug MEssage Enable
- CPU Wakeup Timer
- Delayed Authentication Mode
Advanced / Trusted Computing Menu

The Advanced / Trusted Computing Menu contains TPM information as well as the following options:
- Security Device Support
- SHA-1 PCR Bank
- SHA256 PCR Bank
- Pending Operation
- Platform Hierarchy
- Storage Hierarchy
- Endorsement Hierarchy
- TPM2.0 UEFI Spec Version
- Physical Presence Spec Version
- TPM 20 InterfaceType
- Device Select
Advanced / ACPI Menu

The Advanced / ACPI Menu contains the following configuration options:
- Enable ACPI Auto Configuration
- Enable Hibernation
- ACPI Sleep State
- Lock Legacy Resources
- S3 Video Repost
Advanced / S5 Menu

The Advanced / S5 menu allows the user to enable / disable Wake From S5.
Advanced / SMART Menu

The Advanced / SMART Menu allows the user to enable / disable SMART.
Advanced / Serial Port Console Redirection Menu

The Advanced / Serial Port Console Redirection Menu has the following options:
- Console Redirection
- Legacy Console Redirection Settings
- Windows Emergency Management Services Console Redirection
Advanced / Acoustic Management Configuration

The Advanced / Acoustic Mangement Configuration Menu allows the user to enable / disable acoustic management of a given SATA device.
Advanced / Switchable Graphics Menu

Advanced / AMT Graphics Menu

The Advanced / AMT Graphics Menu allows the user to set the output for AMT Graphics.
Advanced / PCI Settings Menu

The Advanced / PCI Settings Menu allows BME DMA Mitigation to be enabled / disabled.
Advanced / USB Settings Menu

The Advanced / USB Settings menu contains the following configuration options:
- Legacy USB Support
- XHCI Hand-Off
- USB Mass Storage Driver Support
- USB transfer time-out
- Device reset time-out
- Device power-up delay
Advanced / CSM Menu

Advanced / NVMe Menu

Advanced / SDIO Menu

Advanced / RAM Disk Menu

Advanced / Networking Stack Menu

Advanced / Networking Options Menus
These next few networking stack-related options are only visible if networking has been enabled.
Advanced / VLAN Menu

Advanced / Ethernet Interface Menu

Advanced / UEFI HTTP Boot Menu

Advanced / Ethernet Menu

Advanced / WiFi Menu

Chipset Menu

The chipset menu contains a few additional platform configuration options. The sub-menu’s available here are:
- Firmware Configuration
- Type C Support
- System Agent Configuration
- PCH-IO Configuration
Note that by default, the Firmware Configuration is set to [Test].

Additional options for Firmware Configuration include:
- Ignore Policy Update
- Production
- Test
Chipset / Graphics Configuration

The following options are availabe for primary display:
- Auto
- IGFX
- PCI
- SG
I set this option to PCI to work with my HDMI capture card. By default it is set to auto.
Security Menu

The Security menu allows the user to set an Administrator Password or a User Password. The Administrator Password allows access to BIOS Setup, while the User Password allows POST and access to BIOS Setup.
Additionally, Secure Boot can be configured in this menu.
Security / Secure Boot Menu
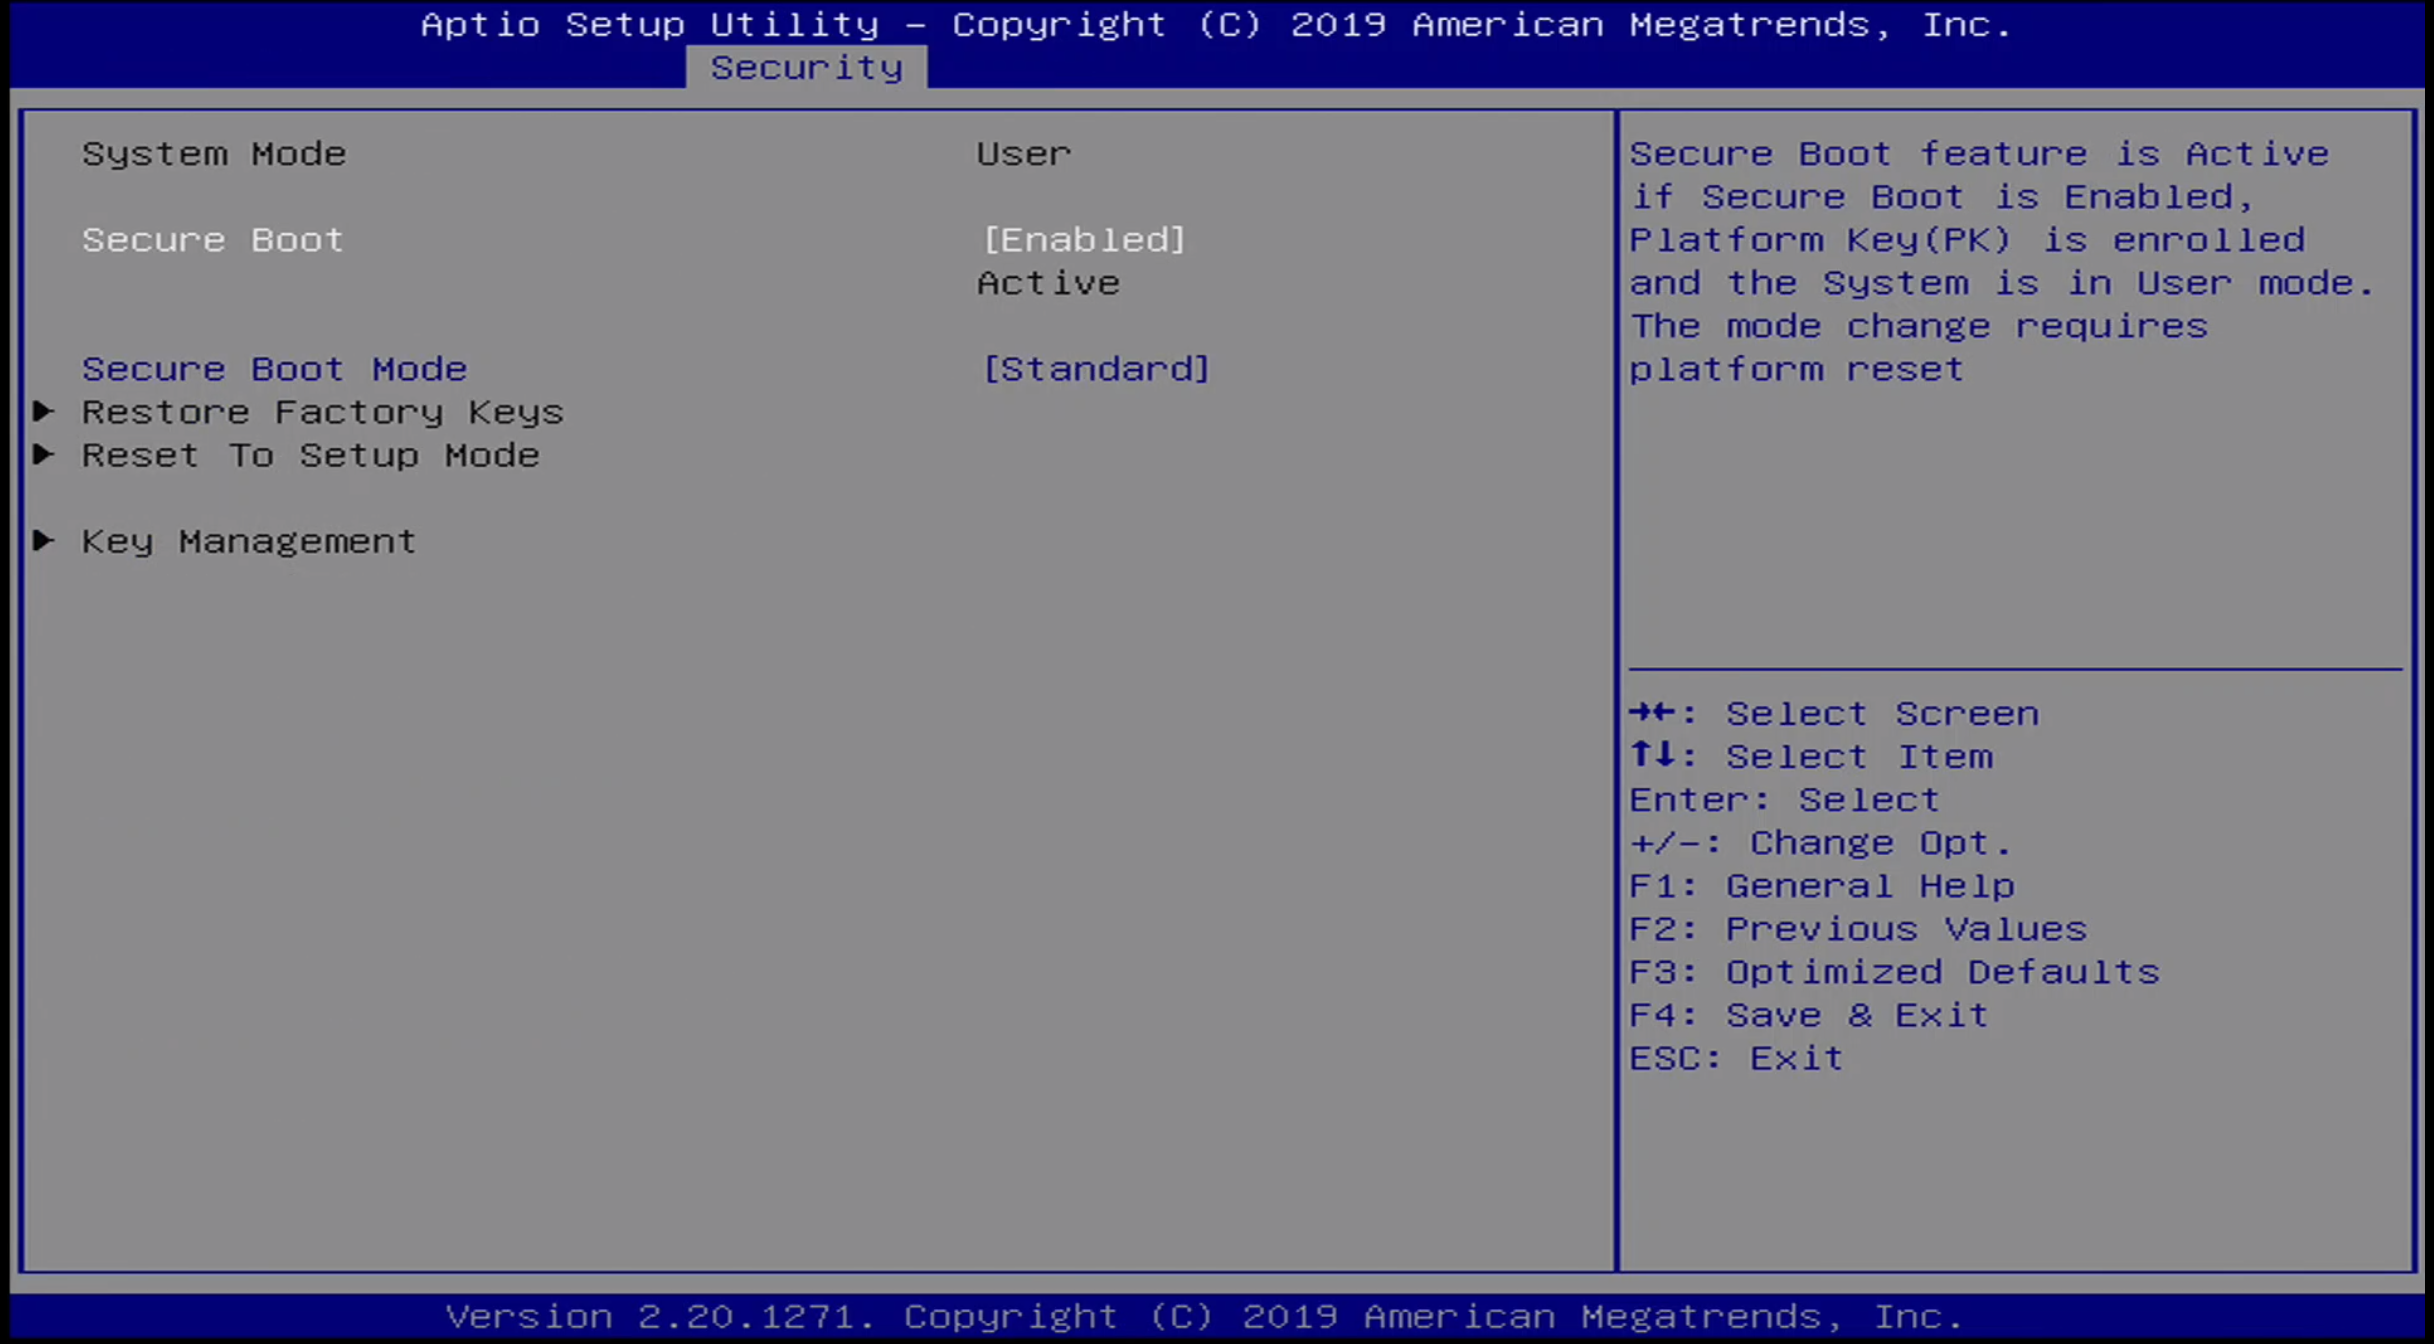
There are two options for Secure Boot Mode:

- Standard
- Custom
Note the Secure Boot is enabeld by default.
Boot Menu
The Boot Menu presents the user with options as to boot device order.
Save & Exit Menu
The Save & Exit Menu presents the user with options to save BIOS configuration settings as well as to override the boot settings
Update 10/13/2021
@RockerFernando reached out to me with some additional details. Apparently there are Gateway-branded laptops that have the same BIOS as the ONN-branded laptop. Like me, he had bricked his laptop by setting the same BIOS option. I was pretty sure that by resetting the NVRAM we could restore our laptops to a usable state, and @RockerFernando went and figured out how to do this. If you open the chassis and disconnect the battery, or simply wait a few months until the battery is totally dead, and then hold down the power button for about a minute, you should be able to reset NVRAM thus clearing the faulty configuration value. Thanks @RockerFernando for the tip!